Auth - Integration Guide
Leverage Auth from the zerohash SDK's to seamlessly allow your users to initiate on-chain deposits and withdrawals
Pre-integration Steps
1. Create your organization
During the onboarding process with zerohash, you will receive your organization_id that uniquely represents your Organization. You will need this code for future API calls.
2. Configure your organization
System configurations
- Supported assets: See supported assets here.
- Transfer methods: There are three categories of transfer methods to choose from within the Auth network.
- Custodial wallets
- Non-custodial Wallets
- Manual Transfers
public_key: You should generate a key-pair and share thepublic_keywith zerohash so that we can validate the signature of requests sent by the Organization.
Transaction limits
The Auth configuration system is flexible and can accommodate many types of limit configurations. Notably, here are the most common:
- Maximum and Minimum per-transaction limits: Define the smallest and largest allowable amounts (denominated in fiat) for a single transaction. Auth will enforce these limits for each individual transaction request.
- Maximum daily limits: Set a cap on the total transaction volume allowed per user within a 24-hour period. This helps manage risk and comply with regulatory or internal policy requirements.
3. Webhook configurations
The first step is to provide zerohash with the callback URL that Auth will emit event updates to.
4. Organization credentials
At the end of the onboarding process, each Organization will receive the following configuration details required to integrate with Auth:
organization_id: A unique identifier generated by zerohash, used to identify the Organization within the zerohash platform. (ie, 4789efea-e034-4e6f-b8a0-5289aacec427)- Connect API Credentials:
client_idandclient_secretpair generated by zerohash, used by the Organization to authenticate backend requests to zerohash APIsclient_id: a unique identifier such as 30da17fb-15b2-4723-a63c-0488356e1ed0client_secret: an encryption key such as 7/7+QhFYOH+yeA3KOxgykbbhvUyaCvIE1Z0oHCTLRoz8LDq3uBshZIrGo94GqMoDZ==
Integration Overview
At a high level, the SDK integration involves the following touchpoints:
1. Organization backend generates access token
The Organization generates an access token using the client_id and client_secret provided.
2. Organization backend initializes Auth Session
The Organization initiates a Auth session by making an API call from your backend to zerohash's backend, which returns a jwt token. zerohash APIs must be authenticated using jwt tokens generated in the first step.
3. Organization frontend initializes the zerohash SDK
The Organization initializes the zerohash SDK by passing the jwt received in Step 2. The SDK automatically renders within the specified HTML container.
4. Organization frontend listens to the zerohash SDK callbacks
The Organization should listen to the Auth SDK callbacks to track the user journey, such as onClose, onDepositConfirmation, onDepositFailure, onWithdrawalConfirmation, onWithdrawalFailure
5. Organization backend listens to Webhooks
The Organization should handle webhook calls sent by the zerohash backend to track deposit and withdrawal updates. See full zerohash webhook page here
Integration Specification - Deposits
1. Organization presents Auth as a transaction option
You begin by adding Auth as an available option wherever users initiate stablecoin or crypto deposits - such as deposit screen, or any equivalent interface.
2. Generate an Access Token
When the user selects the Deposit button, initiate the following calls:
Endpoint: POST /api/v1/oauth/token
Request body:
{
  "client_id":"30da17fb-15b2-4723-a63c-0488356e1ed0",
  "client_secret":"7/7+QhFYOH+yeA3KOxgykbbhvUyaCvIE1Z0oHCTLRoz8LDq3uBshZIrGo94GqMoDZ==",
  "organization_id": "4242f55a-37af-47da-afaa-915de877405d"
}
Response status: 200 OK
{
  "access_token":"eyJz93a...k4laUWw",
  "token_type":"Bearer",
  "expires_in":86400
}
By default, Access tokens are valid for 1 hour. This is configurable depending on the Organization's requirements. Get in touch with your zerohash representative to request a custom token expiration policy or to discuss security best practices.
3. Initializing a Connect Session
Endpoint: POST /api/v1/sessions
Request headers:
client-id: 242f55a-37af-47da-afaa-915de877405d // this is your organization_id
authorization: Bearer ... // this is the access token from the previous step
signature: CM/PtaccBFKdsu...
timestamp: 1760484866 // current timestamp
Request body:
{
  "account": {
    "reference_id": "USER01" // the End User's participant_code that was created via POST /participants/customers/new within zerohash
  },
  "session": {
    "metadata": {
	// The Organization can send in any metadata that will be performed in subsequent webhook calls
    },
    "deposit_details": { // Optional when scope includes 'user:deposit:send'
      "account_label": "main_account" // Optional label to identify the account
    }
  },
  "scopes": [
    "user:deposit:send" // enum: "user:deposit:send" || "user:withdrawal:request"
  ]
}
Response status: 200 OK
Response body:
{
   "jwt": "eyJhbGciOiJIUzI1NiIsInR5cCI6IkpXVCJ9...",
   "expires_in": 3600
}
Decoded jwt:
{
  "iss": "zerohash",
  "sub": "3dfb9dc0-9c00-4673-bc2e-5024ae62166d", // Account Id
  "iat": "2025-07-24T15:42:07.123456789Z",
  "exp": "2025-07-24T15:42:07.123456789Z",
  "jti": "9b2e0b75-00dc-4f5f-a11b-c48d46b16e15",
  "organization": {
    "id": "4789efea-e034-4e6f-b8a0-5289aacec427"
  },
  "account": {
    // zerohash Generated
    "id": "16b0e957-f3fd-41d0-b312-f2ec291de6e4",

    // Unique User Account identifier assigned by the Organization
    "reference_id": "USER01"
  },
  "session": {
    // zerohash generated
    "id": "16b0e957-f3fd-41d0-b312-f2ec291de6e4"
  }
}
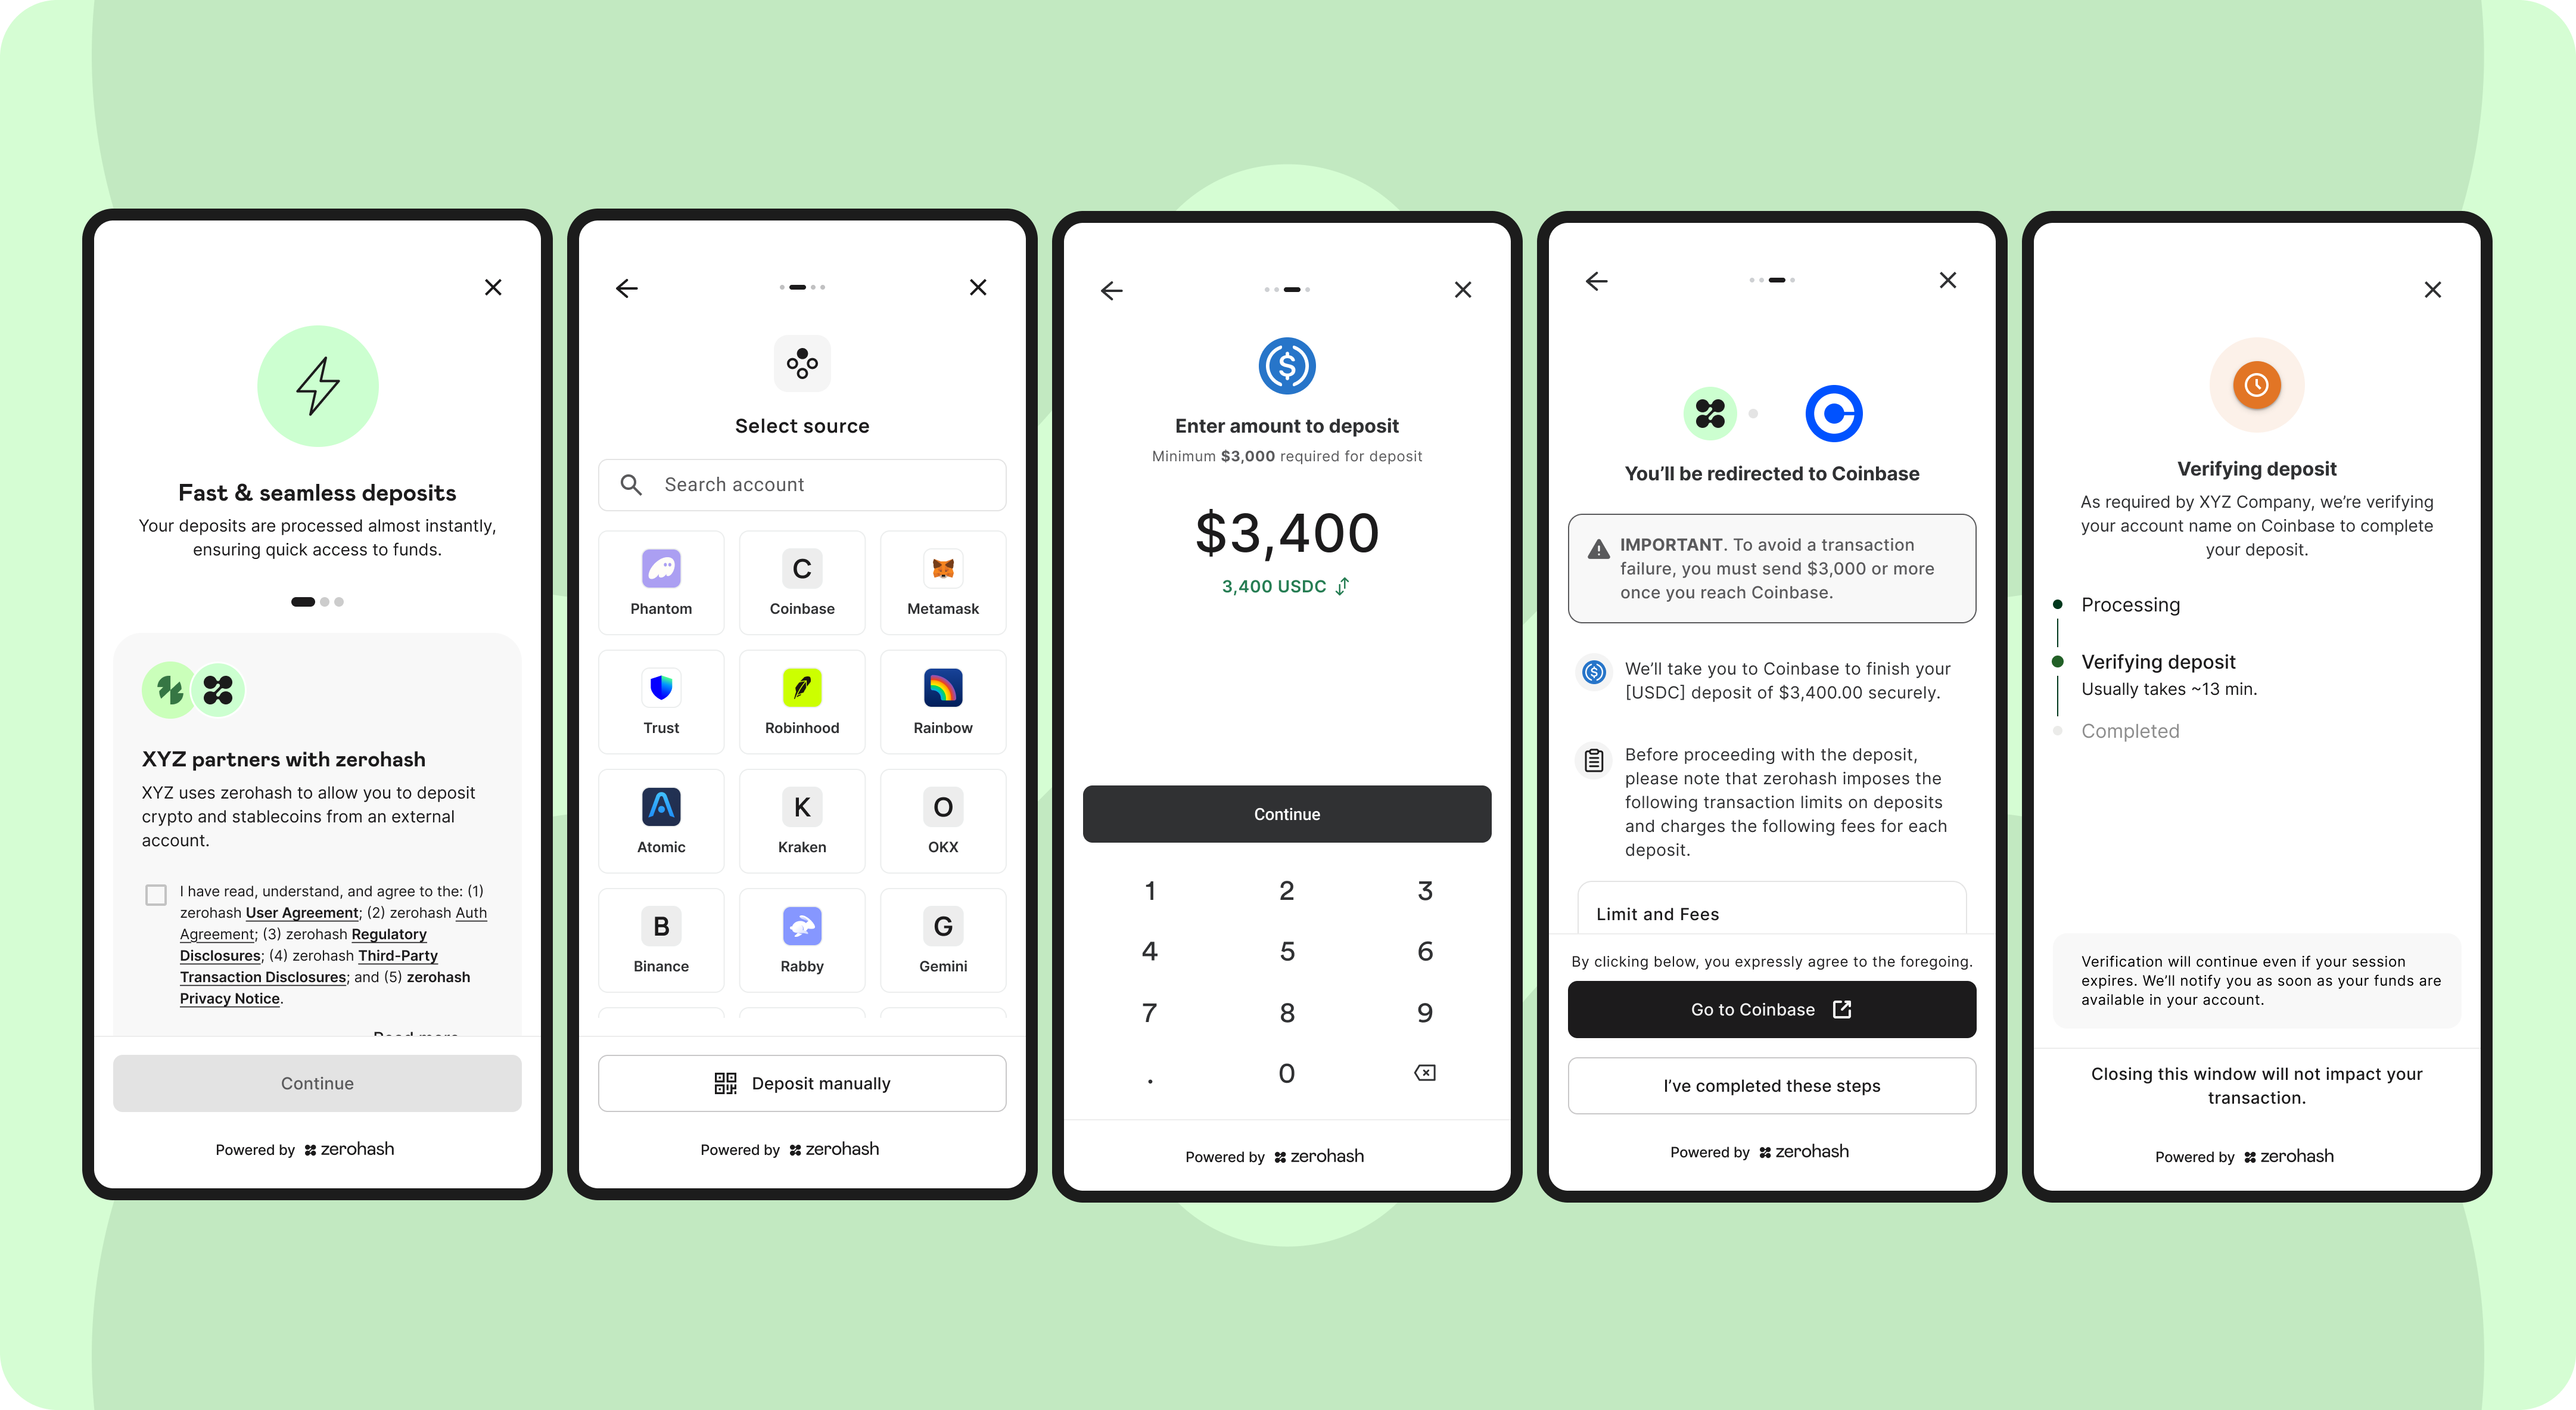
4. SDK Flow
Landing screen
The Landing Page is the first screen that the user will see. This screen displays the Auth Terms, Privacy Policy, Regulatory Disclosures, and captures explicit consent for the terms of this product:
Menu screen
The Menu screen allows the customer to select the Auth network custodial wallet or non-custodial wallet provider for the transfer.
Enter exchange credentials
- Once the wallet provider is selected the customer will be required to input their login credentials in order to proceed with any transfers in or out
- A customer account matching process will take place if the Auth Validate service has been enabled at the time of onboarding your Organization
Auth Validate will impact which wallet options are available for your customers. Please work with your account representative to understand the options available to use.
Exchange - 2FA
- Depending on the user's settings at the exchange or wallet, they will be asked to complete some form of 2FA (ie, SMS, Authenticator, Passkey, etc)
Select Asset
zerohash will display the current balances of whichever Auth integration was selected:
Enter amount
The customer will now specify the amount of crypto/stablecoins to deposit:
Review
The customer will be asked to review the details of the deposit:
Note: the above depicts a mobile use case. For web, the SDK will automatically detect this and display a button instead of a slider
Auth - 2FA
Depending on the user's exchange configuration, it is typical for user's to be forced to perform another 2FA assertion before any money movement takes place. Example screen:
Deposit processing
The deposit has now been broadcasted on-chain and is en-route to zerohash. The customer can choose to stay on this screen to monitor the progress, or navigate away (navigating away from this screen will not affect the completion of the deposit):
Deposit failed
EXTREMELY RARE
The below screen will display after the above Processing screen in the following 2 scenarios:
- The connected-accounts' (ie, Robinhood) systems failed to process the deposit
- The blockchain that the asset was sent on-chain was down
In both cases, the user's account at the connected account will be re-credited, and the user is expected to try their transaction again.
If the user selects Try Again , then the SDK will return the user back to the Menu Screen where they can retry the flow
Deposit completed
The deposit has confirmed on-chain, zerohash has sent the Auth Completed webhook and you should be credit the customer's balance on your end:
4. Deposit Webhooks
See full webhook guide here.
Integration Specifications - Withdrawal
1. Generate an Access Token
Endpoint: POST /api/v1/oauth/token
Request body:
{
  "client_id":"30da17fb-15b2-4723-a63c-0488356e1ed0",
  "client_secret":"7/7+QhFYOH+yeA3KOxgykbbhvUyaCvIE1Z0oHCTLRoz8LDq3uBshZIrGo94GqMoDZ=="
}
Response status: 200 OK
{
  "access_token":"eyJz93a...k4laUWw",
  "token_type":"Bearer",
  "expires_in":86400
}
By default, Access tokens are valid for 1 hour. This is configurable though depending on the Organization's requirements. Get in touch with your zerohash representative to request a custom token expiration policy or to discuss security best practices.
2. Initializing an Auth Session
Endpoint: POST /api/v1/sessions
Request body:
{
  "account": {
    "reference_id": "USER01" // the End User's participant_code that was created via POST /participants/customers/new within zerohash
  },
  "session": {
    "metadata": {
	// The Organization can send in any metadata that will be performed in subsequent webhook calls
    },
    "withdrawal_details": {
      "amount": ".013",
      "asset": "BTC",
      "network": "bitcoin",
      "account_label": "main_account" // Optional label to identify the account
    }
  },
  "scopes": [
   "user:withdrawal:request" // enum: "user:deposit:send" || "user:withdrawal:request"
  ]
}
Response status: 200 OK
Response body:
{
  "token": {
    "jwt": "eyJhbGciOiJIUzI1NiIsInR5cCI6IkpXVCJ9...",
    "expires_in": 3600
  }
}
Decoded jwt:
{
  "iss": "connect",
  "sub": "3dfb9dc0-9c00-4673-bc2e-5024ae62166d", // Account Id
  "iat": "2025-07-24T15:42:07.123456789Z",
  "exp": "2025-07-24T15:42:07.123456789Z",
  "jti": "9b2e0b75-00dc-4f5f-a11b-c48d46b16e15",
  "organization": {
    "id": "4789efea-e034-4e6f-b8a0-5289aacec427"
  },
  "account": {
    // zerohash Generated
    "id": "16b0e957-f3fd-41d0-b312-f2ec291de6e4",

    // Unique User Account identifier assigned by the Organization
    "reference_id": "USER01"
  },
  "session": {
    // zerohash generated
    "id": "16b0e957-f3fd-41d0-b312-f2ec291de6e4"
  }
}
4. SDK Flow
Landing screen
The Landing Page is the first screen that the user will see. This screen displays the Auth Terms, Privacy Policy, Regulatory Disclosures, and captures explicit consent for the terms of this product:
Menu screen
The Menu screen allows the customer select the Auth integration centralized exchange or non-custodial wallet to link and ultimately withdraw to.
Enter exchange credentials
- Once the wallet provider is selected the customer will be required to input their login credentials in order to proceed with any transfers in or out
- A customer account matching process will take place if the Auth Validate service has been enabled at the time of onboarding your Organization
Auth Validate will impact which wallet options are available for your customers. Please work with your account representative to understand the options available to use.
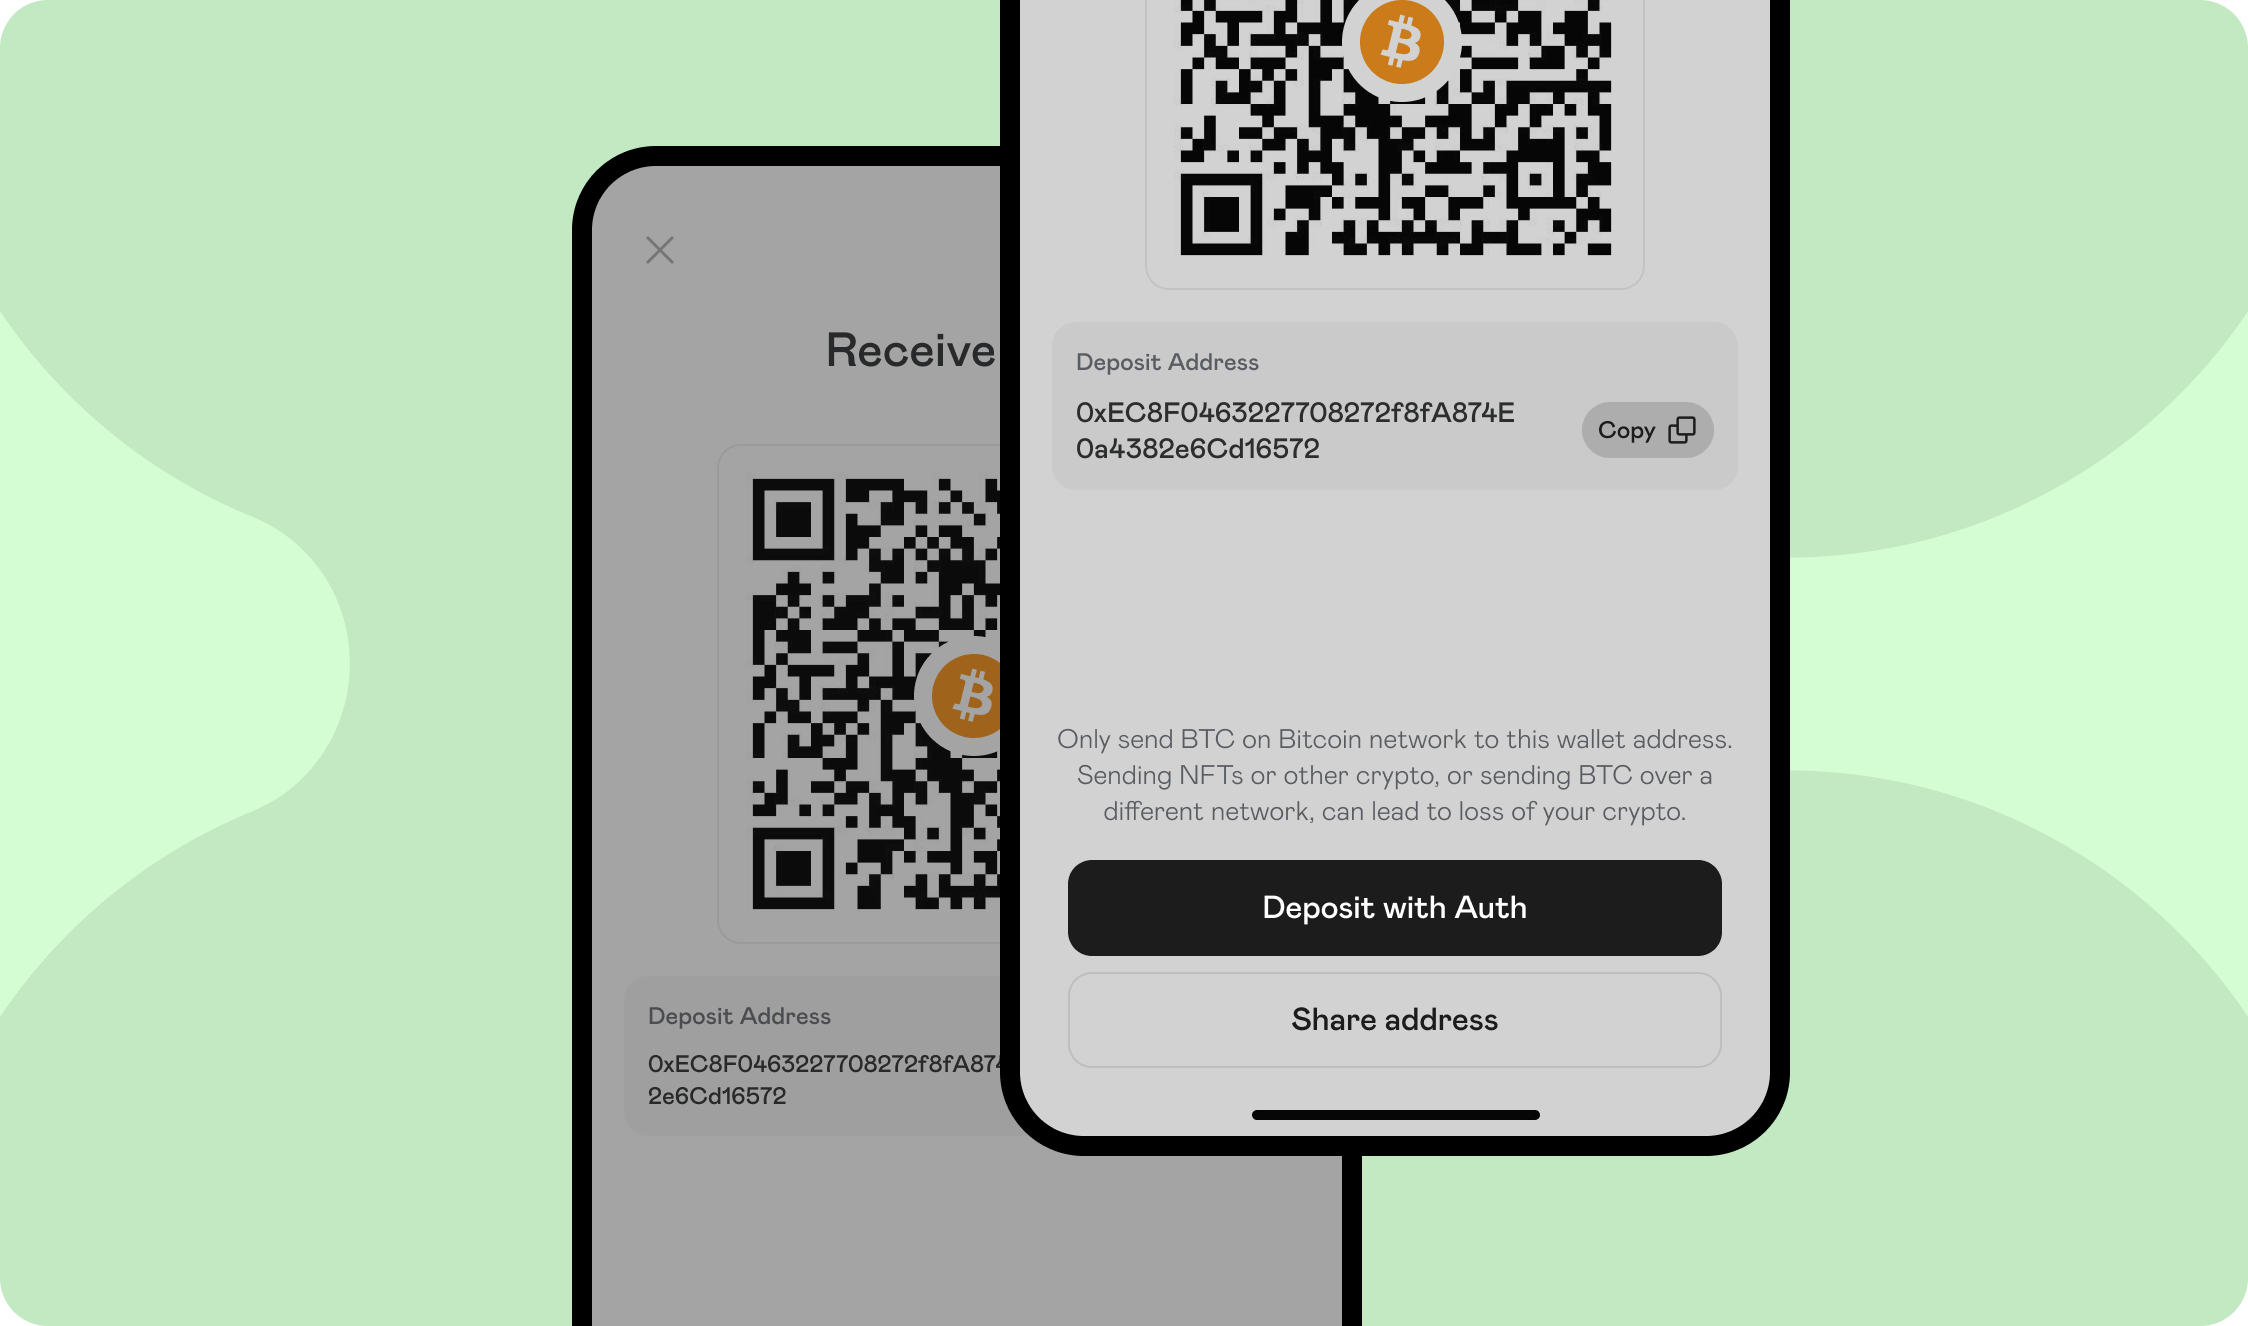
Select Asset
zerohash will display the current balances:
Enter amount
The customer will now specify the amount of crypto/stablecoins to withdraw:
Review
The customer will be asked to review the details of the withdraw:
Auth - 2FA
Depending on the user's exchange configuration, it is typical for user's to be forced to perform another 2FA assertion before any money movement takes place. Example screen:
Withdrawal processing
The withdraw has now been broadcasted on-chain and is en-route to the destination wallet. The customer can choose to stay on this screen to monitor the progress, or navigate away (navigating away from this screen will not affect the completion of the withdraw):
Withdrawal completed
The withdrawal has confirmed on-chain and zerohash has sent the Auth Completed webhook
5. Withdrawal Webhooks
See full webhook guide here.
Updated 10 days ago