Payins Integration Guide
Power your checkout with crypto and stablecoins - end to end integration guide
Introduction
The Payins product allows payment service providers or merchants to offer stablecoins or crypto as a payment option at checkout.
Definitions
| Term | Definition |
|---|---|
| Platform | The company that is under contract with zerohash and integrates directly with zerohash's APIs or SDKs. |
| Merchant | A business entity (non-natural person) that serves as the customer-facing front-end in the transaction flow. Typically, the Merchant is a customer of the Platform and is where the Shopper initiates their interaction. In some cases, the Merchant and Platform may be the same entity. |
| Shopper | The natural person that pays for the good or service |
How the Integration Works
A high-level summary of each integration step, showing whether it uses the API or SDK.
| Step | API or SDK? | Notes |
|---|---|---|
| Merchant onboarding | API | |
| Shopper onboarding | API | |
| Shopper accepts zerohash t's and c's | SDK | This is the first page on the SDK a first-time Shopper will see |
| Shopper makes payment | SDK | The SDK will facilitate the asset and network selection and will present the expected crypto/stablecoin quantity, address, and quote timing information |
| Initiate refund | API | |
| Initiate return | API |
1. Submit Merchant
Merchant Information
This section is only applicable if the Platform is not also acting as the Merchant. Typically Payment Service Providers (PSP's) who acquire merchants will need to submit Merchants to zerohash.
Begin by submitting the Merchant via POST /participants/entity/new
{
    "platform_code": "PLAT01",
    "entity_name": "Merchant XYZ",
    "legal_name": "Merchant XYZ Inc.",
    "contact_number": "15553765432",
    "website": "www.merchant.com",
    "date_established": "2018-01-15",
    "entity_type": "llc",
    "address_one": "1 Main St.",
    "address_two": "Suite 1000",
    "city": "Chicago",
    "postal_code": "12345",
    "jurisdiction_code": "US-IL",
    "tax_id": "883987654",
    "id_issuing_authority": "United States",
    "risk_rating": "low",
    "risk_vendor": "passbase",
    "sanction_screening": "pass",
    "sanction_screening_timestamp":1677252628000,
    "metadata":{},
    "signed_timestamp":1677252629000,
    "submitter_email": "[email protected]",
    "submitter_first_name": "Josh"
    "submitter_last_name": "Doe"
    "submitter_title": "Senior Legal Council"
    "control_persons":[
      {
        "name": "Joe Doe",
        "email": "[email protected]",
        "address_one": "1 South St.",
        "address_two": "Suite 2000",
        "city": "Chicago",
        "postal_code": "12345",
        "jurisdiction_code": "US-IL",
        "date_of_birth": "1980-01-30",
        "citizenship_code": "US",
        "tax_id": "123456789",
        "id_number_type": "us_passport",
        "id_number": "332211200",
        "kyc": "pass",
        "kyc_timestamp": 1630623005000,
        "sanction_screening":"pass",
        "sanction_screening_timestamp":1677252628000,
        "control_person": 1
      }
    ],
    "beneficial_owners":[
      {
        "name": "Jane Doe Jr",
        "beneficial_owner":1,
        "email": "[email protected]",
        "address_one": "1 North St.",
        "address_two": "Suite 3000",
        "city": "Chicago",
        "postal_code": "12345",
        "jurisdiction_code": "US-IL",
        "date_of_birth": "1980-01-30",
        "citizenship_code": "US",
        "tax_id": "012345578",
        "id_number_type": "us_drivers_license",
        "id_number": "P11122243333",
        "kyc": "pass",
        "kyc_timestamp": 1630623005000,
        "sanction_screening": "pass",
        "sanction_screening_timestamp":1677252628000
      }
    ]
}
You’ll receive a participant_code in the response - this is the Merchant participant code that uniquely identifies the merchant indefinitely. We’ll use MERCH1 as the participant_code throughout the examples.
See response for expected shape.
You must submit at least 1 beneficial_owners and 1 control_persons. If these persons do not have an SSN, you must submit an ID document via POST /participants/entity/documents.
Merchant Documents
Your Merchant will not become approved unless you also supply the proper documents via POST /participants/entity/documents endpoint. Depending on the entity_type that was used in the original POST /participants/entity/new call, the document requirements vary. See details here.
Next, submit the Merchants documents via POST /participants/entity/documents:
{
    "document": "...", // base 64 encoded file that you wish to upload (10mb limit)
    "mime": "image/png",
    "document_type": "articles_of_incorporation",
    "file_name": "test.png",
    "participant_code": "MERCH1"
}
State Logic
After a successful POST /participants/entity/new submission, the initial status of the entity will be submitted. In order to transition this to approved, you must then submit all required documents via POST /participants/entity/documents.
2. Query Merchant
You can query already-submitted Merchants via the GET /participants endpoint. If you'd like to query a specific Merchant, use theparticipant_code parameter.
3. Fund Refund Account
To enable future refunds, you must pre-fund your Refund account by sending a wire transfer to the designated bank account provided by our settlement team. Ensure the wire memo is tagged with your Platform code + "_refund" (ie, PLAT01_refund):
Here are the account details:
- Participant_code: 00SCXM
- Account_group: PLAT01 (replace with your
participant_code) - Account_label: pay_refund
- Account_type: available
- Asset: USD
4. Submit Shopper
Next, you'll need to onboard the end users (ie, "Shoppers"). Depending on each Shopper's transaction volume and residence, we have differing level of KYC requirements. See table below:
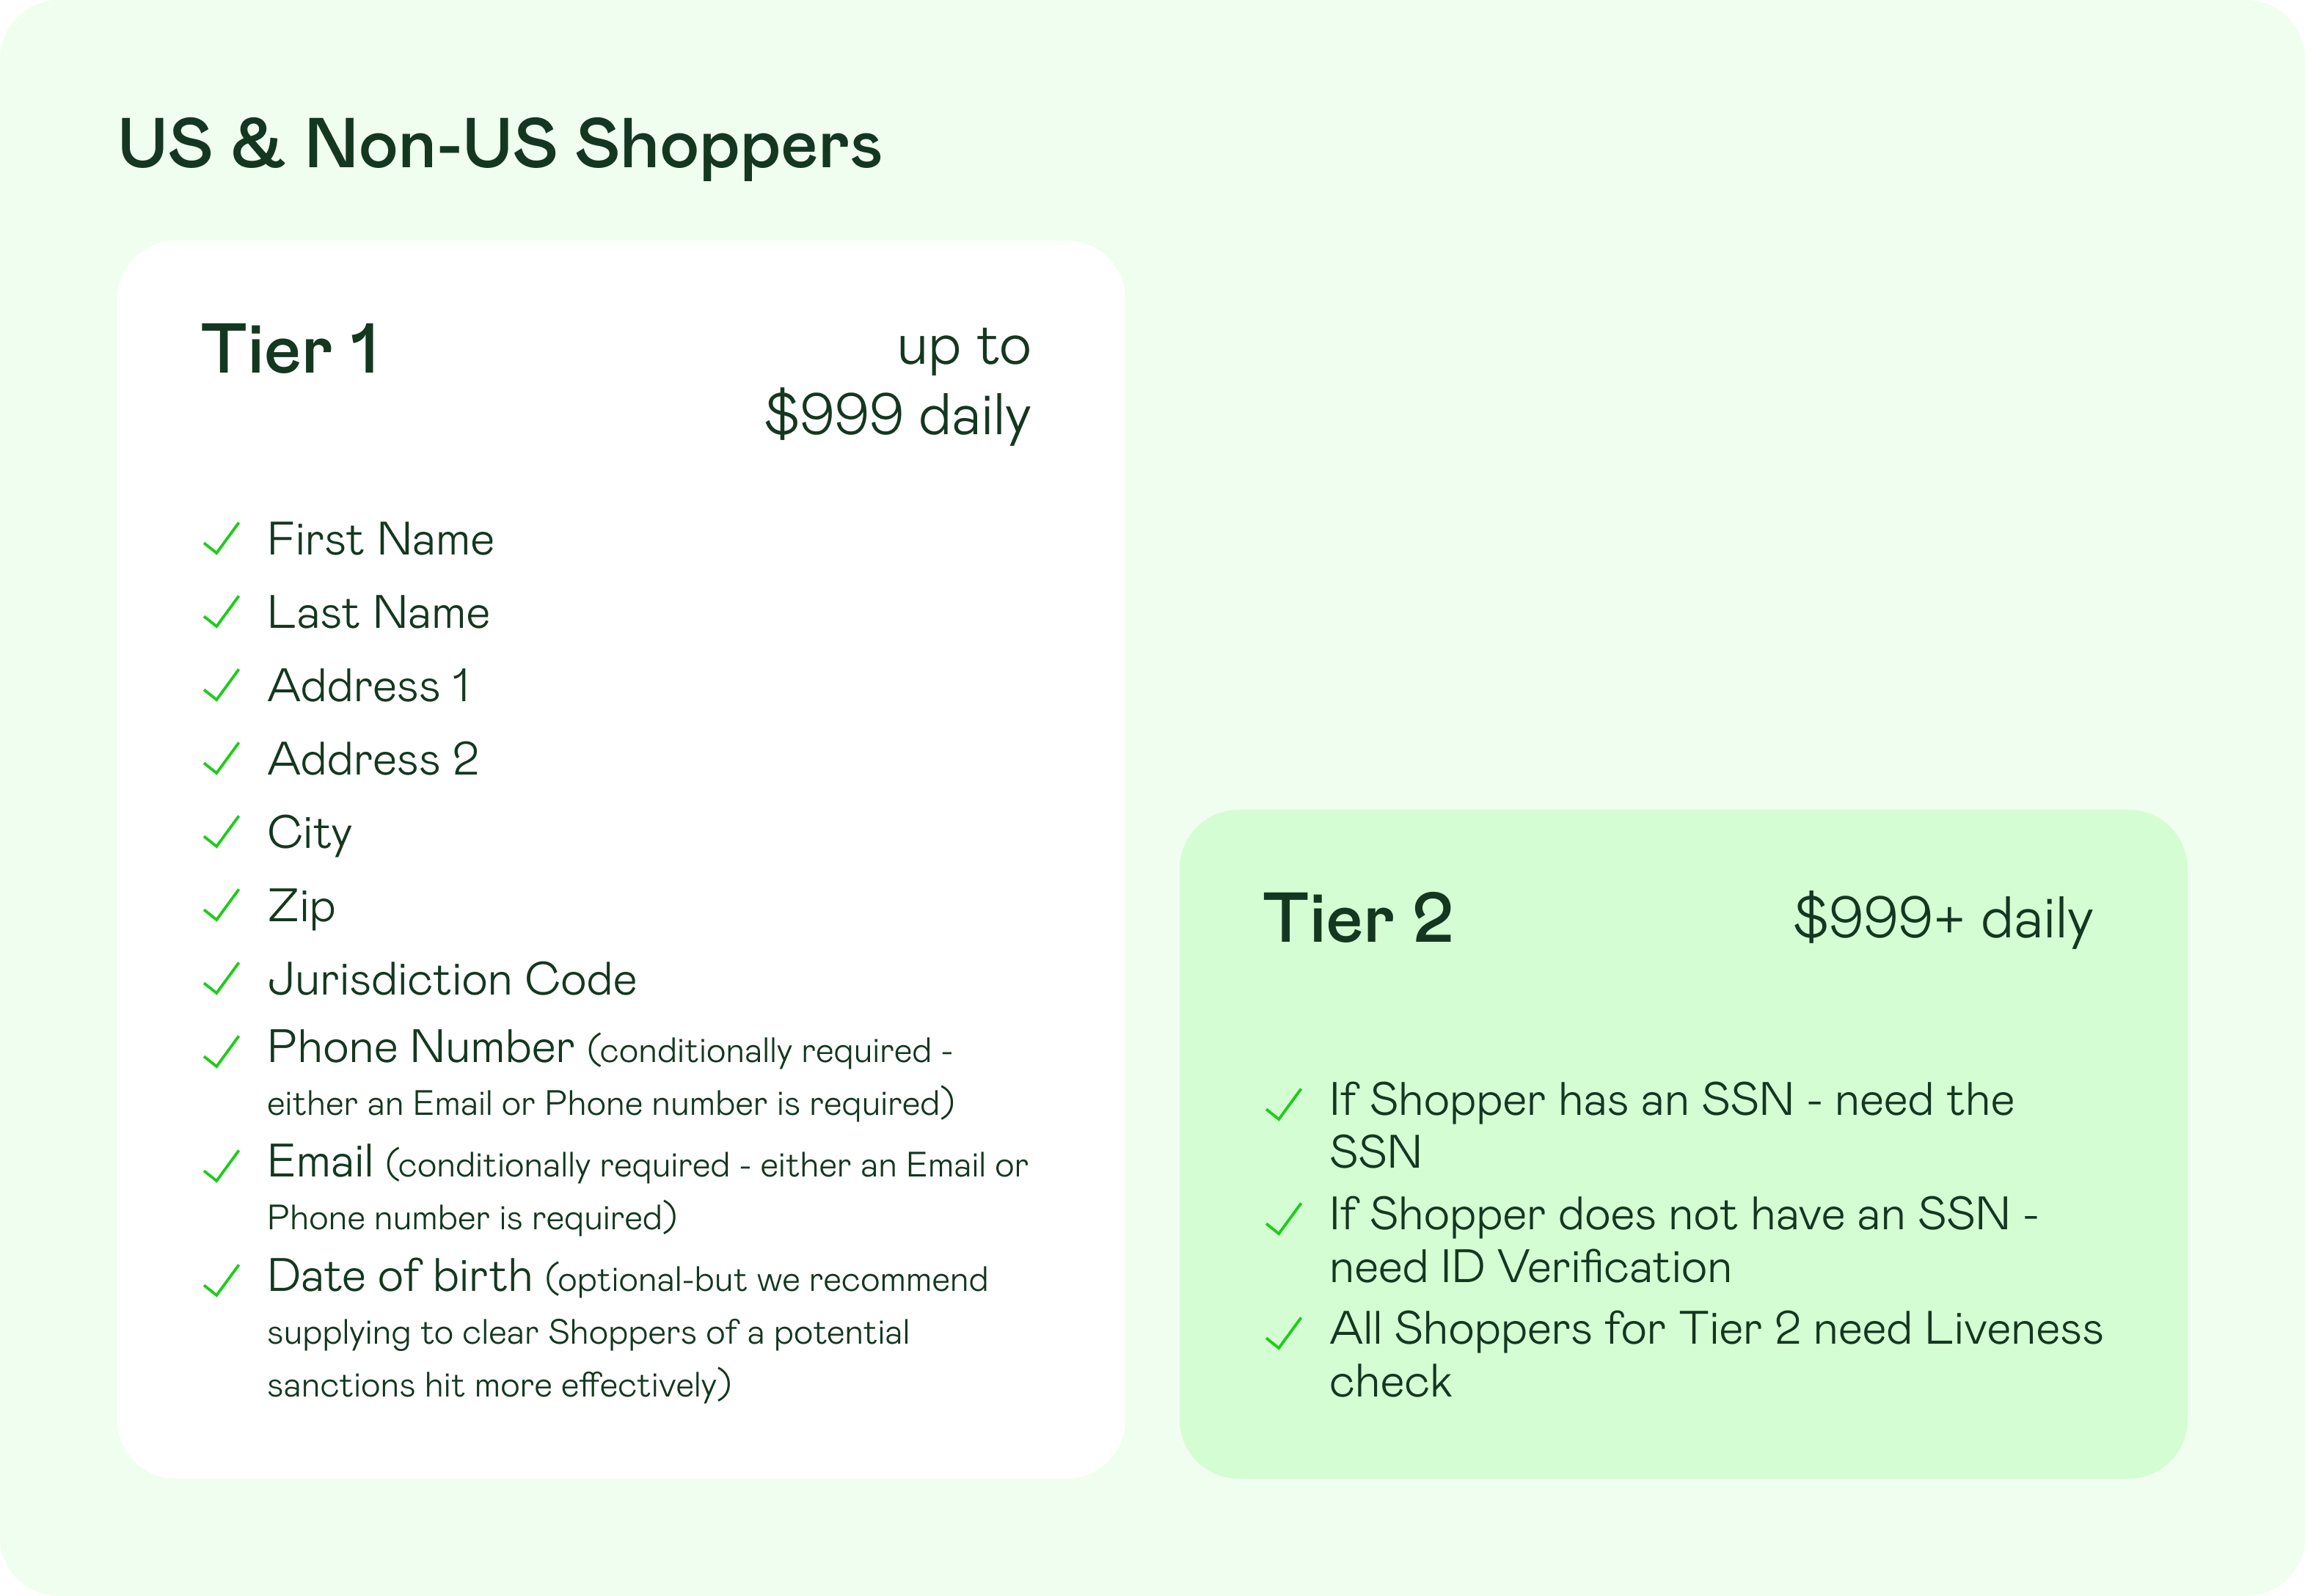
If a Shopper’s total payment volume exceeds $999 within a 24-hour period, you must meet Tier 2 requirements before any further payments can be processed.
To submit a shopper, send a request to the POST /participants/customers/new endpoint.
Tier 1 Submission Example
Example POST /participants/customers/new request:
{
    "first_name": "John",
    "last_name": "Smith",
    "address_one": "1 Main St.",
    "address_two": "Suite 1000",
    "zip": "10014",
    "city": "New York City",
    "jurisdiction_code": "US-NY",
    "phone_number": "123456789",
    "date_of_birth": "1992-01-10",
    "partial": "true",
}
For the below examples, we'll use the sample Shopper participant code of
SHOPP1
5. Query Shopper
To retrieve general information about the shopper, query the GET /participants endpoint. You can also use the participant_code filter to retrieve an individual Shopper.
6. Query Shopper Limits
To check a Shopper’s accumulated volume over the past 24 hours, query the GET /participant/{participant_code}/limits endpoint. Example response:
{
    "participant_code": "SHOPP1",
    "limits": [{
            "type": [
                "payment"
            ],
            "period": 24,
            "balance":"100"
            "limit": "999",
            "asset": "USD"
      }
    ]
}
Interpretation of the above: over the last 24 hours, the Shopper has done $100 of payment activity.
7. Accounts
The Platform will have the following accounts at Zero Hash:
| Account | Description | Technical Details |
|---|---|---|
| Settlement Account | The fiat account that contains the balance of successful payments | - participant_code = [your platform code] - account_group = [your platform code] - account_label = general - account_type = available - asset = USD (or other fiat currency being used) |
| Refund Float Account | The fiat account, funded by the Platform, that is used to refund Shoppers. The balances here will be converted to a crypto or stablecoin asset and sent on-chain to the Shopper. See section, "11. Refund a Payment" below for details | - participant_code = 00SCXM - account_group = [your platform code] - account_label = pay_refund - account_type = available - asset = USD (or other fiat currency being used) |
| Error Account | The fiat account that accumulates due to error scenarios (over payment, under payment, incorrect asset or network, late payment | - participant_code = [your platform code] - account_group = [your platform code] - account_label = pay_error - account_type = available - asset = USD (or other fiat currency being used) |
8. Initiate Payment
Now, let's move onto money movement. Begin by requesting an access token specifying:
| Field | Description | Example Value | Required? |
|---|---|---|---|
participant_code | The 6-digit alpha numeric code associated with the Customer that is looking to withdraw (the response of the original POST /participants/customers/new call) | SHOPP1 | Y |
permissions | The array of permissions that will be granted to the returned JWT token | ["crypto-pay"] | Y |
purchase_amount(part of the payment_details object) | The amount of the good or service being paid for, denominated in the denominated_currency | 100 | Y |
denominated_currency(part of the payment_details object) | The fiat or crypto currency in which the purchase amount is priced | USD | Y |
reference_id | Platform-dictated reference id that is tied to any successful payment | 0bd7f7f0-cf26-495f-b2df-e8afe8481ba3 | N |
Example POST /client_auth_token request:
{
 "participant_code": "SHOPP1",
 "permissions": ["crypto-pay"],
 "payment_details" : {
      "purchase_amount": "100",
      "denominated_currency" : "USD"
   },
 "reference_id": "0bd7f7f0-cf26-495f-b2df-e8afe8481ba3"
}
After successfully calling POST /client_auth_token, the next step is to initiate the Payins SDK flow. See the example below for how to implement this in a React application. Keep in mind that if you're using a Native Mobile App (Swift, Flutter, etc) instead of using zh-web-sdk you should follow the WebView approach, described here.
import React from 'react';
import ZeroHashSDK, { AppIdentifier } from 'zh-web-sdk';

const App = () => {
  const sdk = new ZeroHashSDK({
    zeroHashAppsURL: "https://web-sdk.cert.zerohash.com",
    PAYJWT: "<JWT_TOKEN_HERE>"
  });

    sdk.openModal({
    appIdentifier: AppIdentifier.PAY,
  })
  return <></>;
}

export default App;
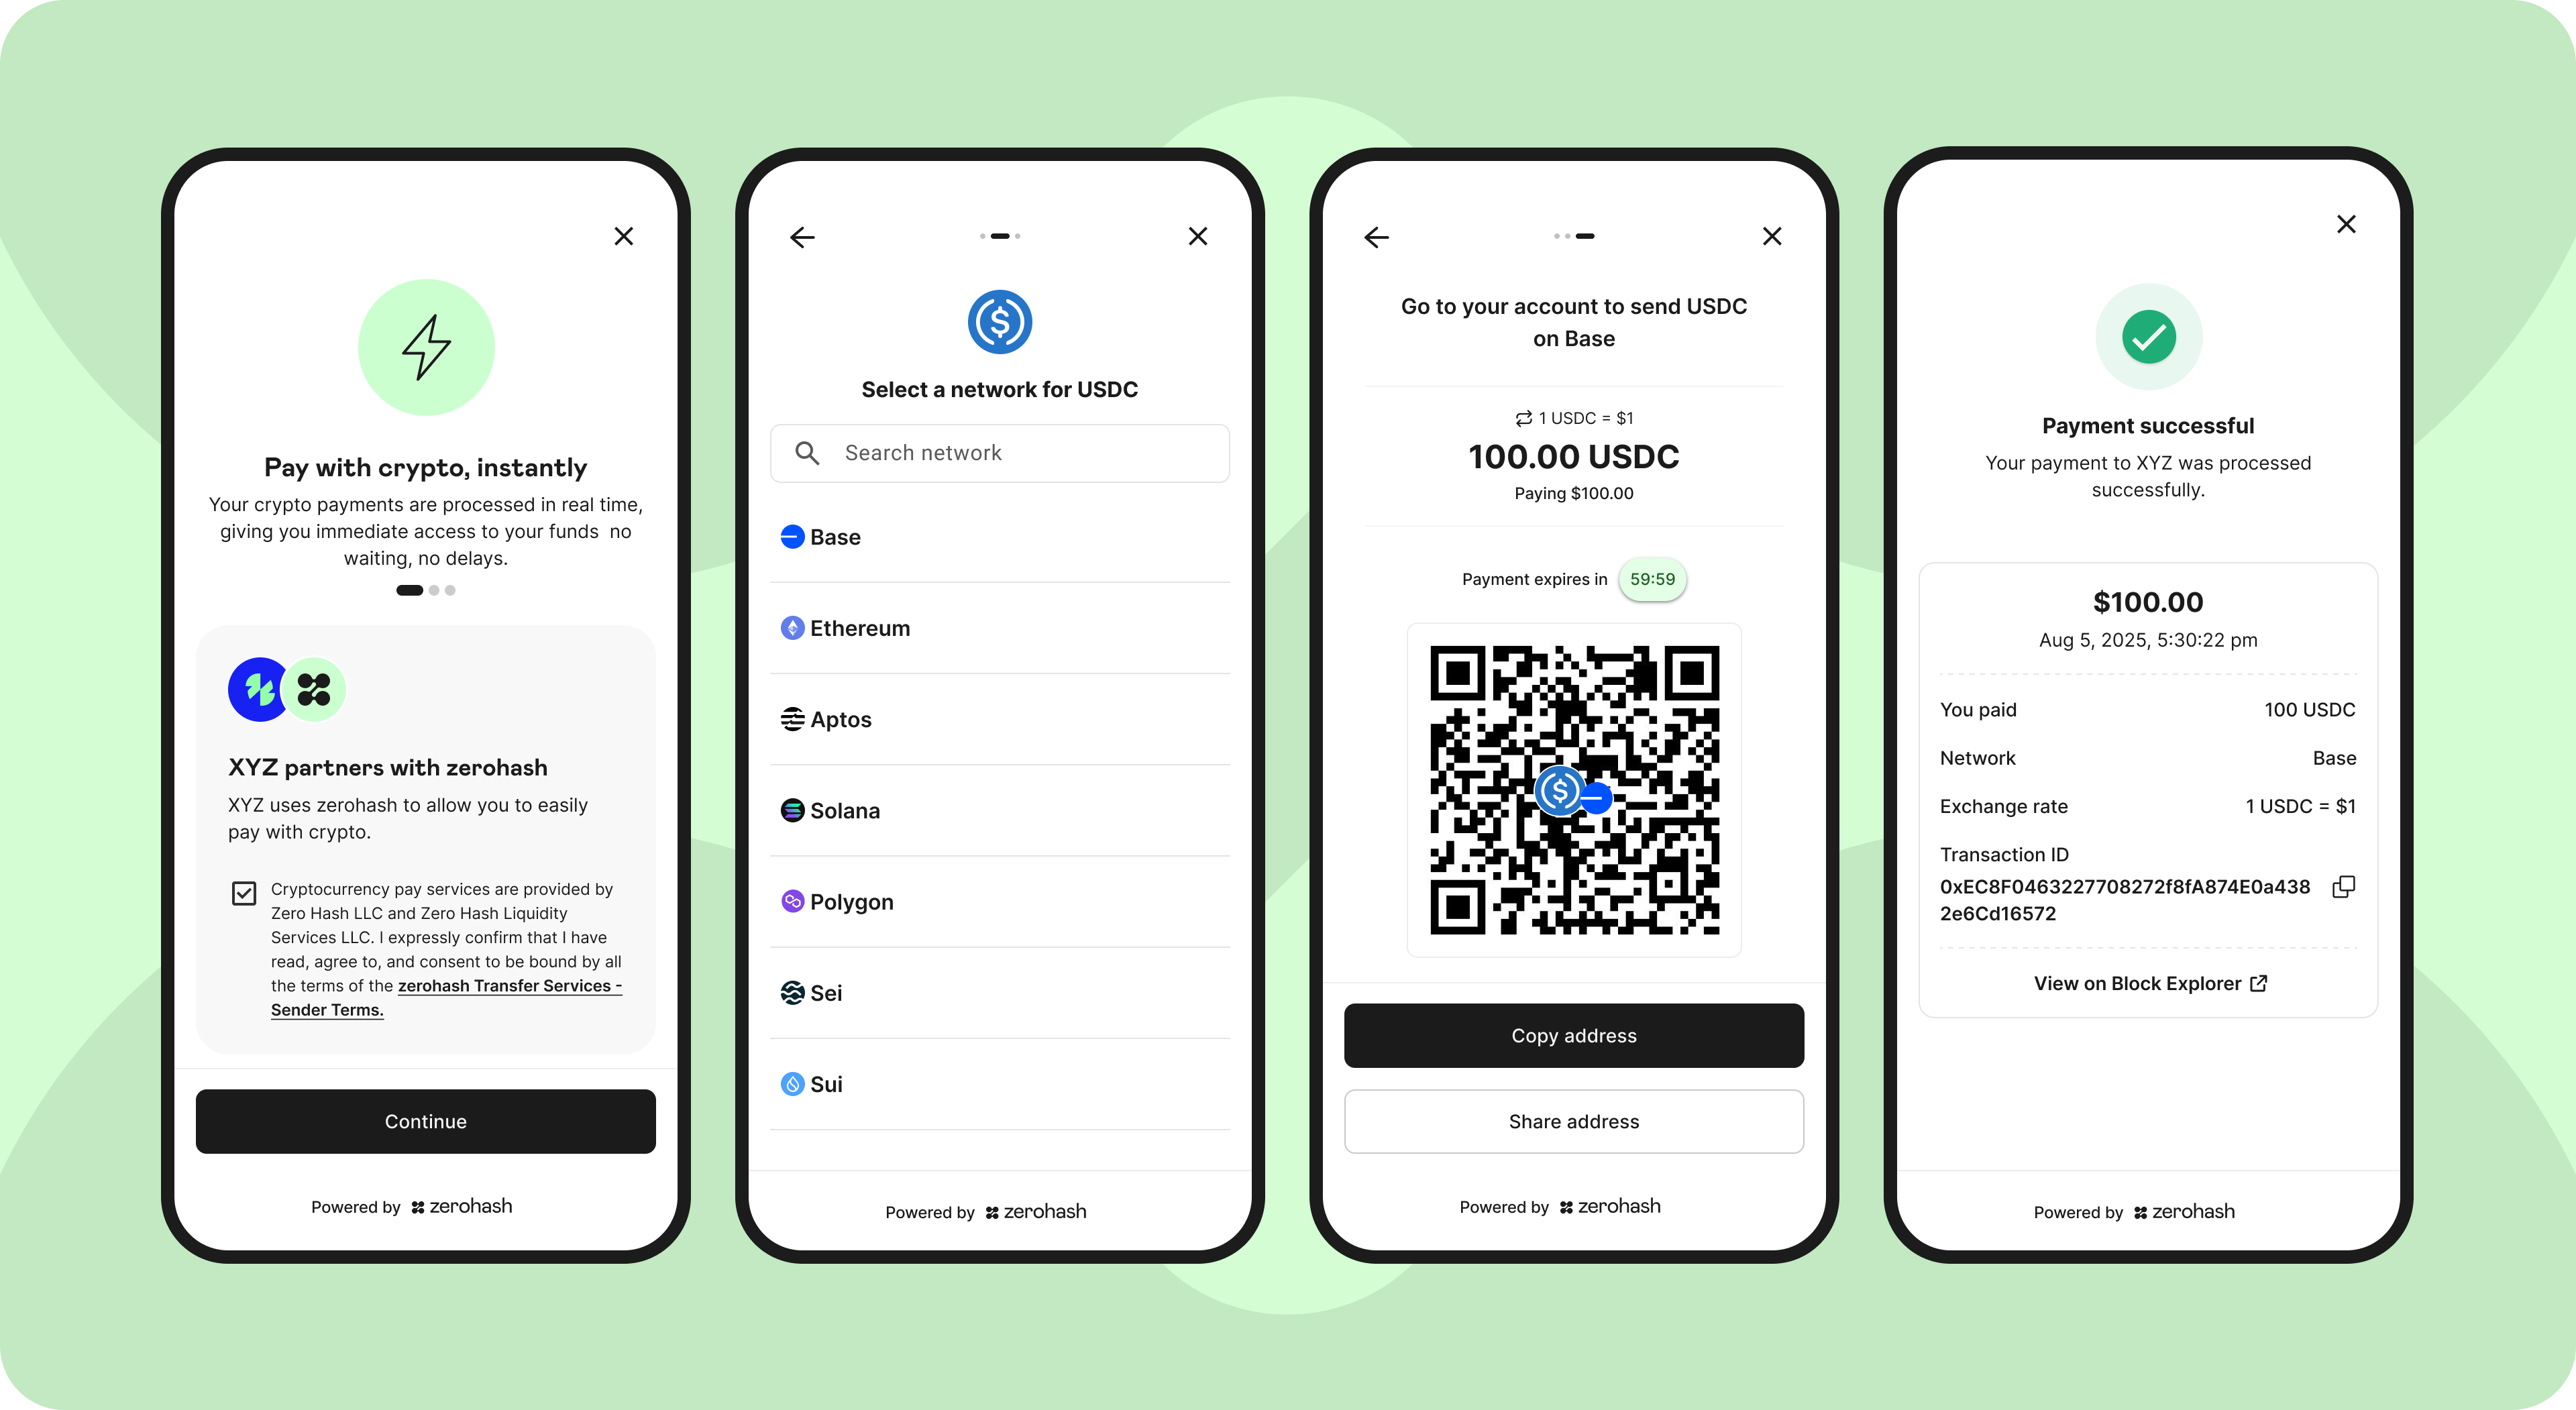
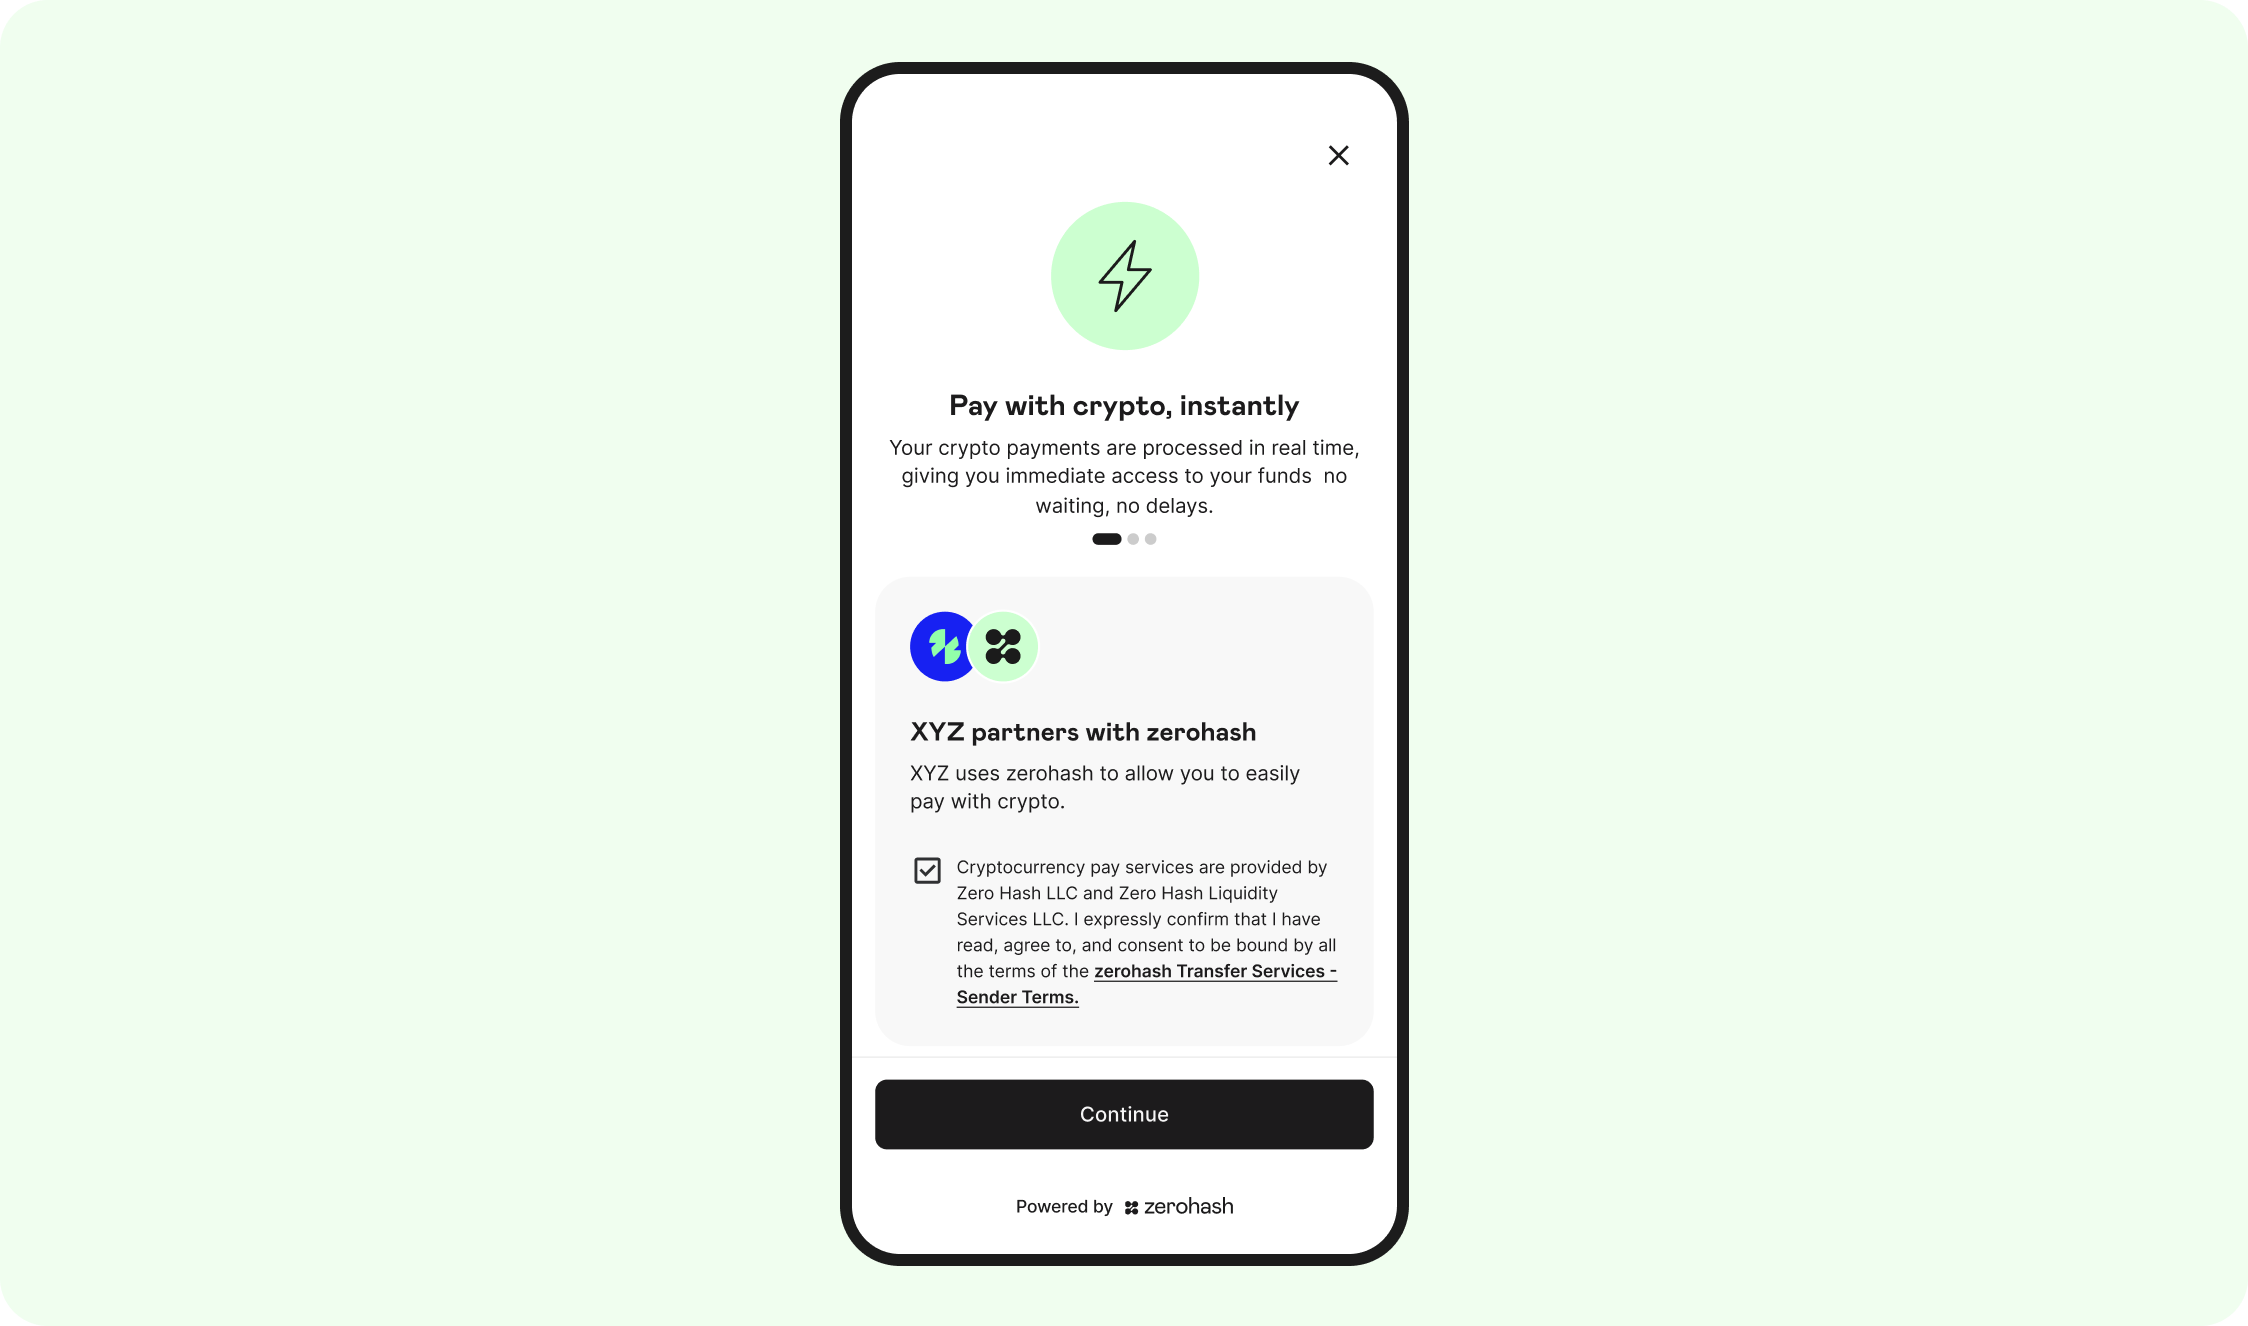
8a. Accept T's and C's
First-time Shoppers will need to accept the zerohash terms and conditions:
8b. Select asset and network
The Shopper will now select the asset they want to pay with. Remember, the assets that are displayed on this screen are your choice - contact your zerohash contact to make the proper configurations:
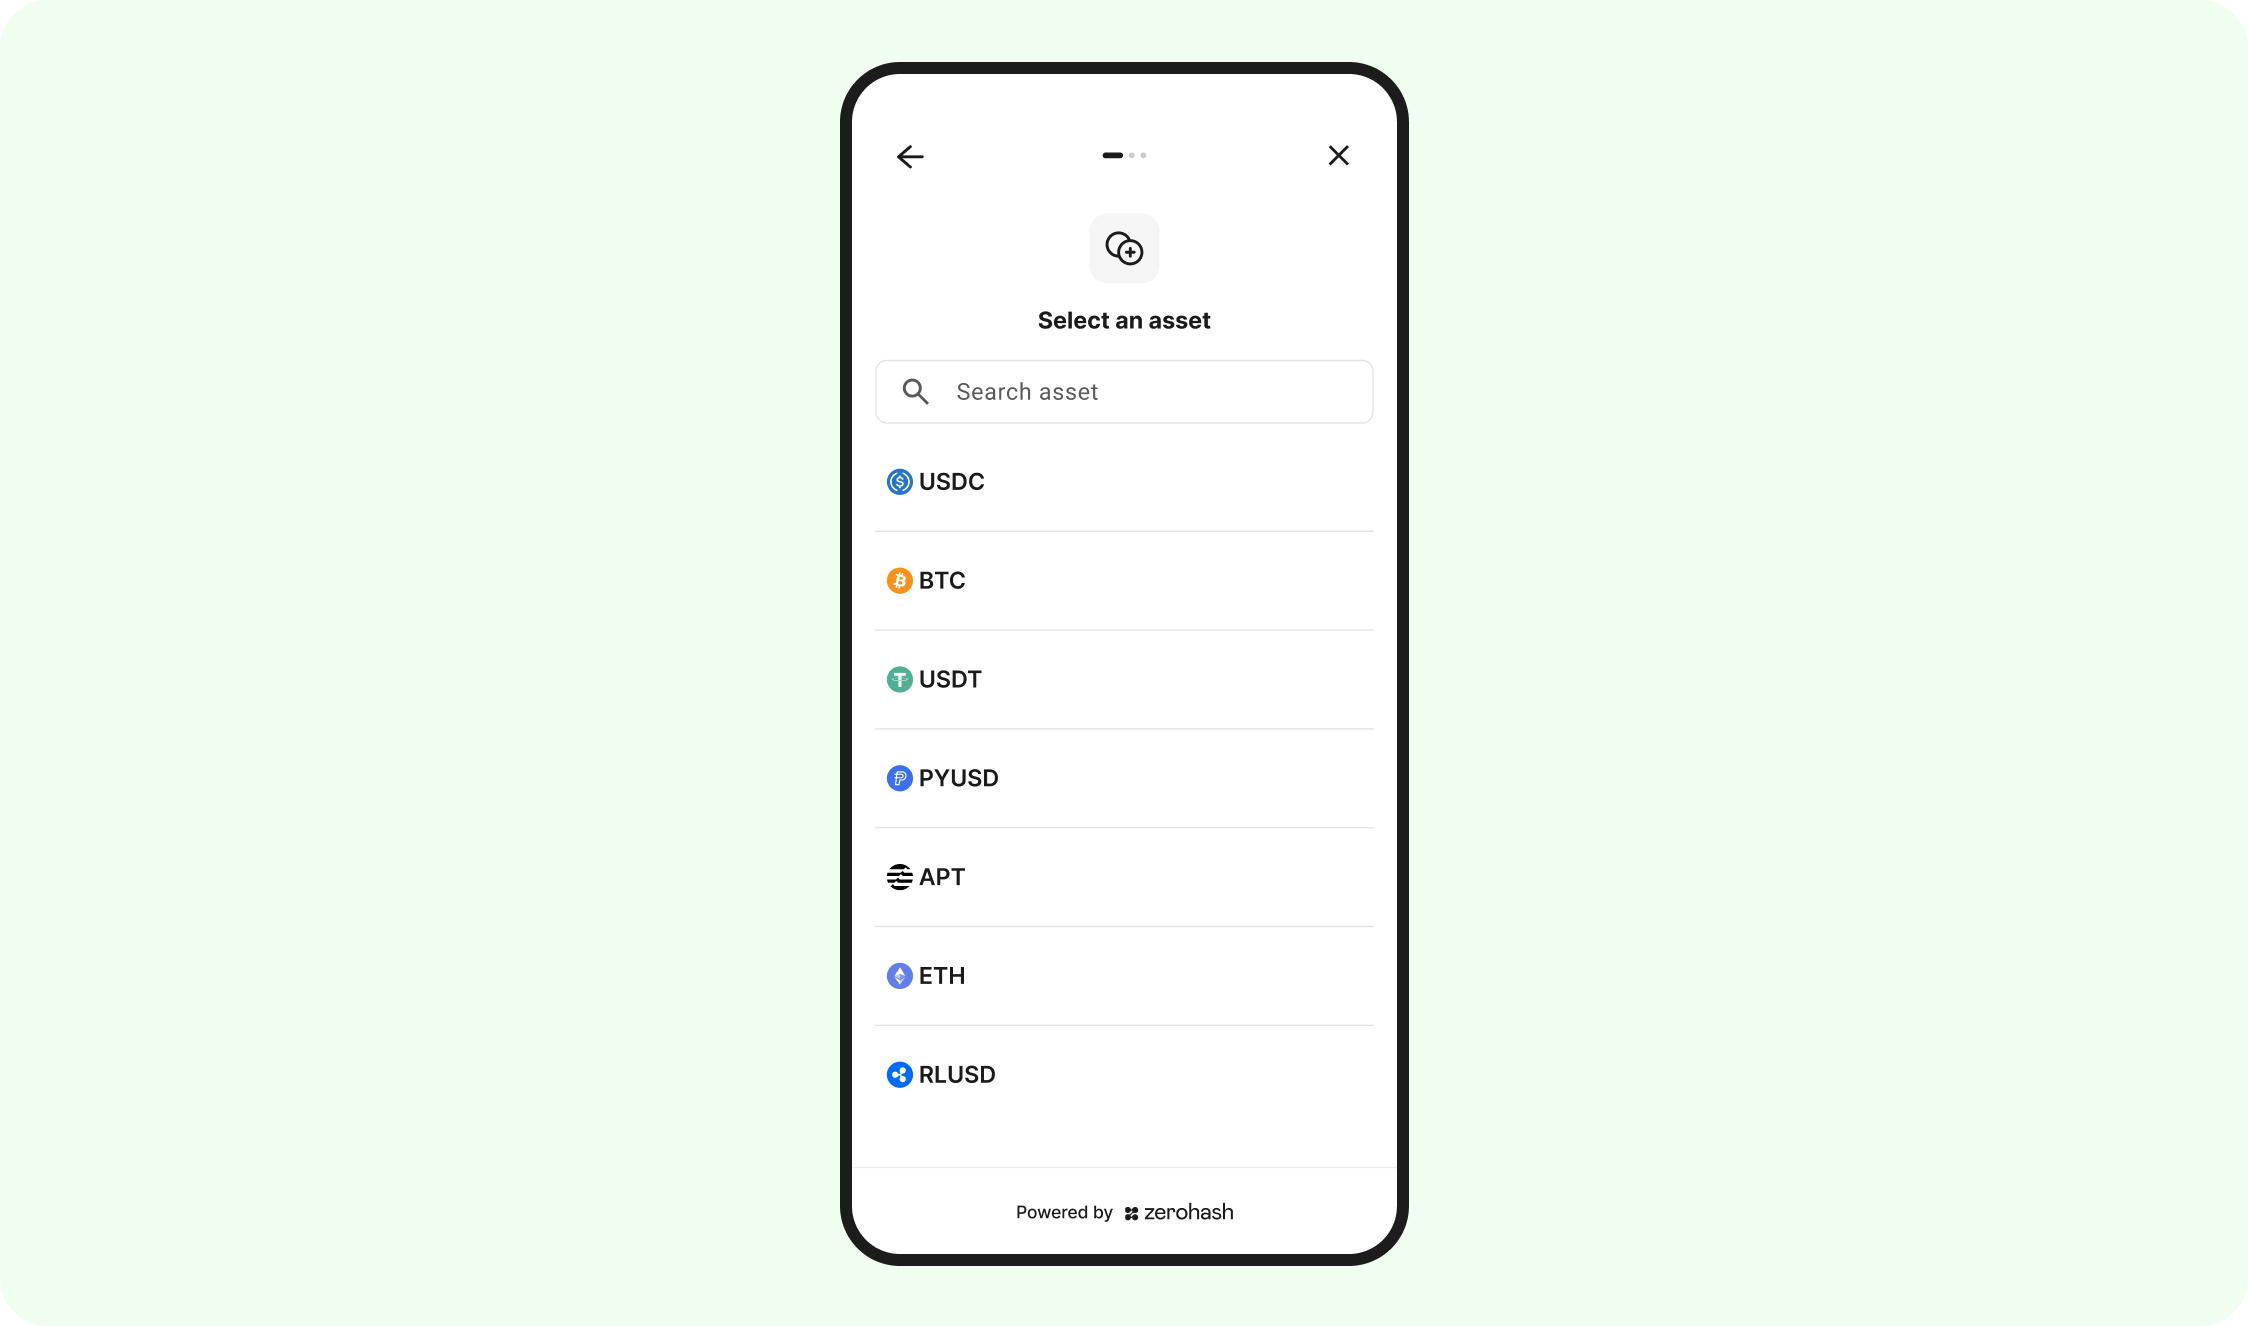
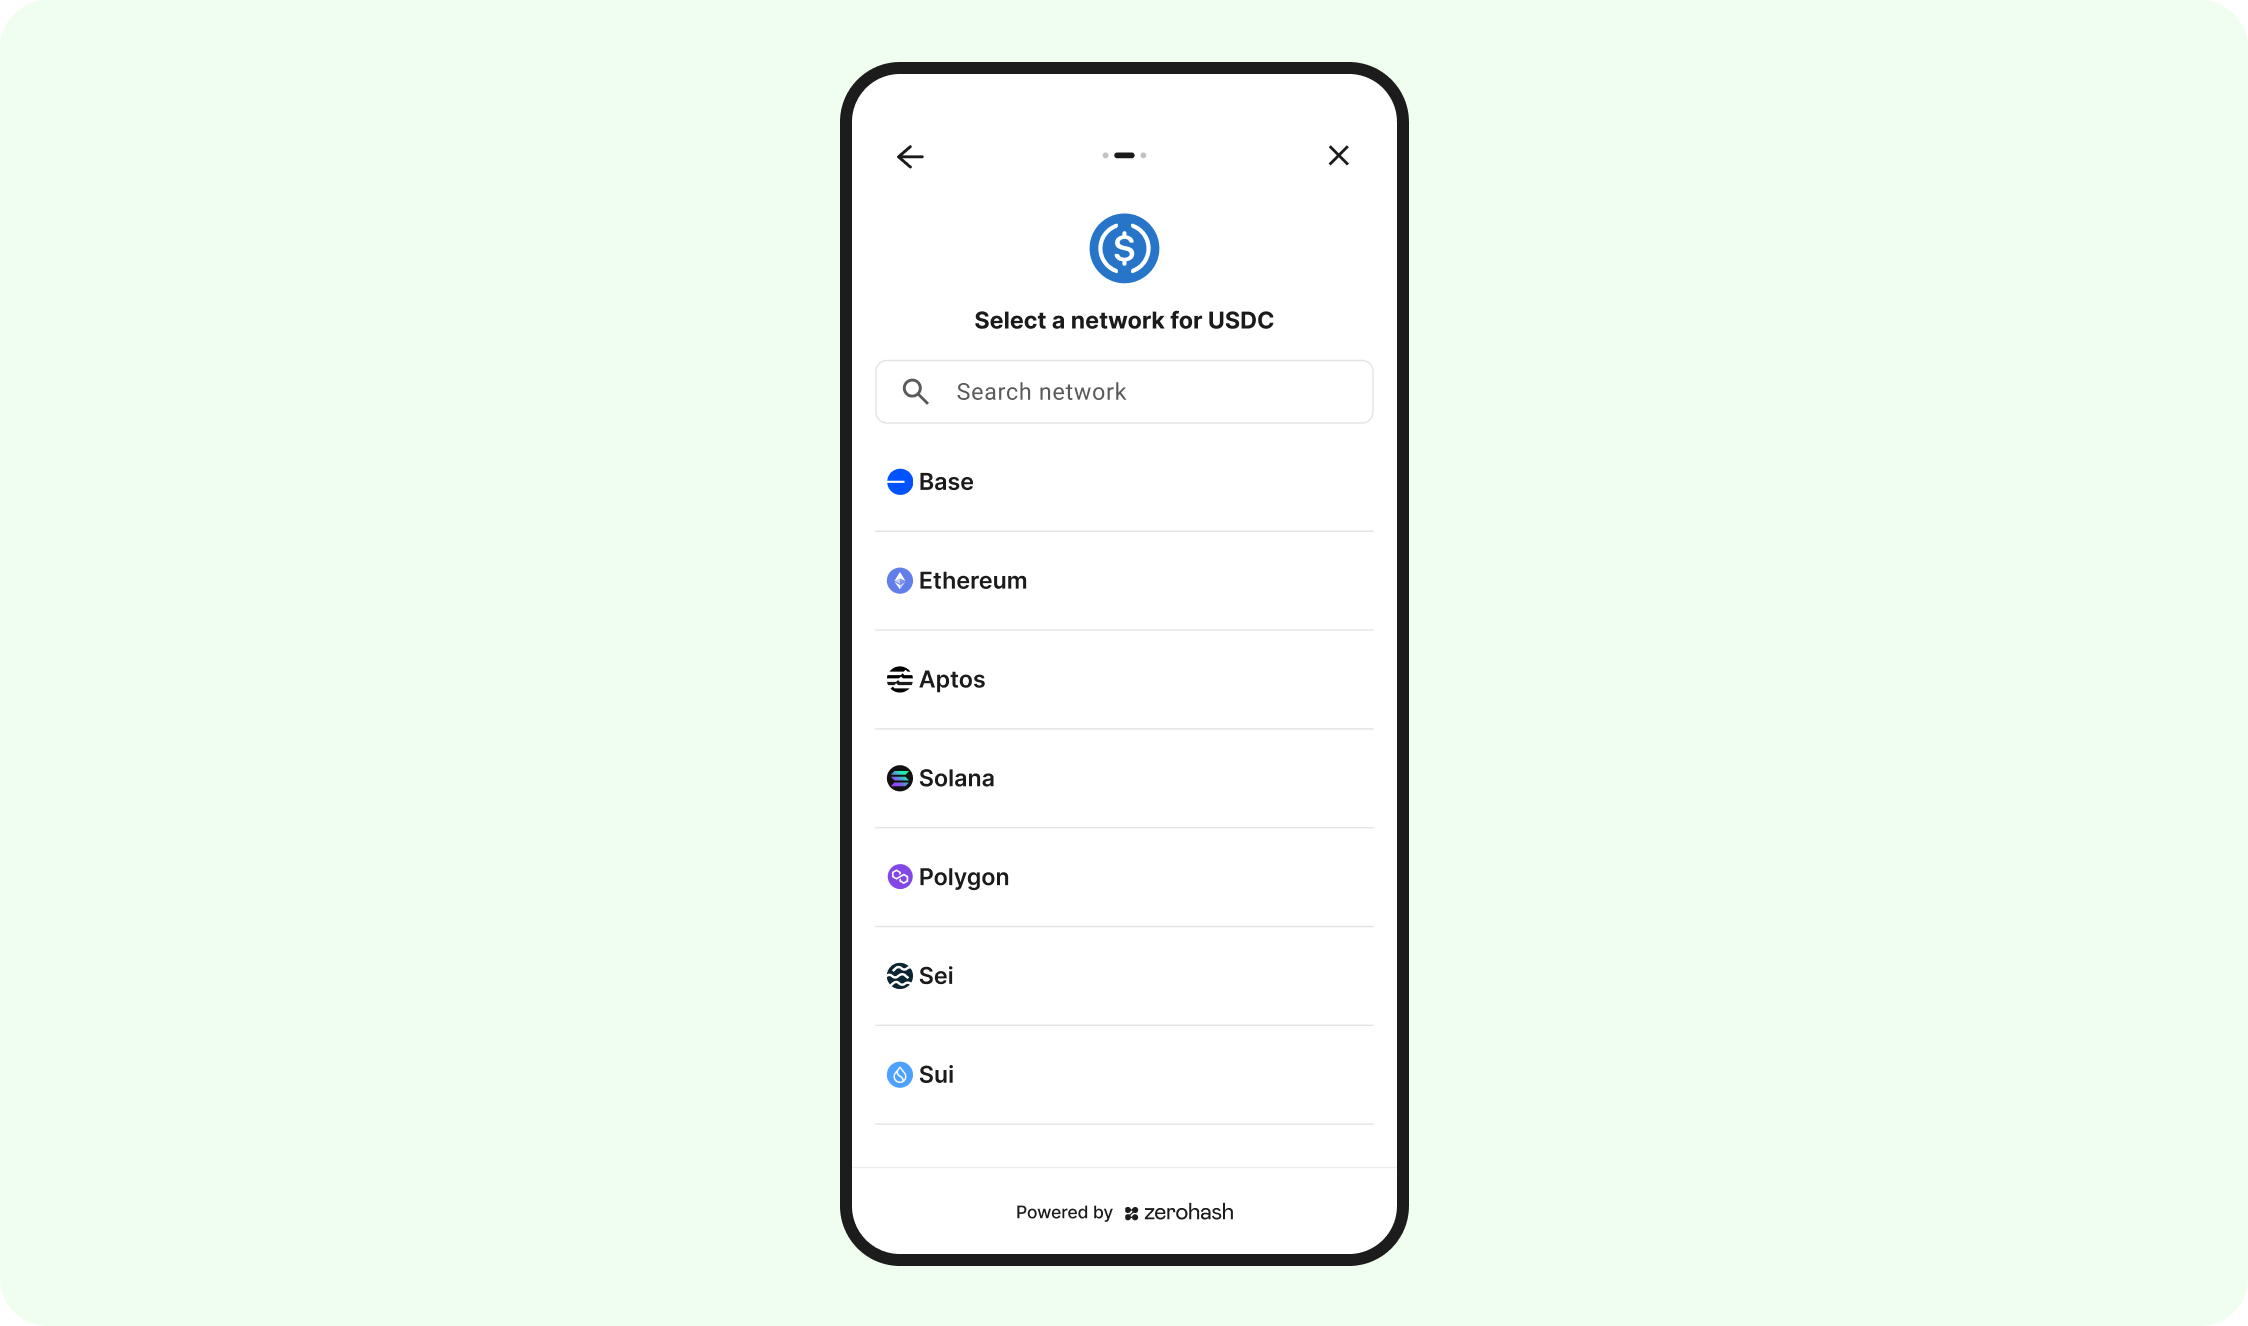
Depending on the selected asset, the next screen may prompt the Shopper to choose a network. If the asset only supports a single network - for example, Bitcoin (BTC) only supports the Bitcoin network for this product currently - the Select Network screen is skipped.
In the example below, USDC was selected as the asset, which supports multiple networks. As a result, the next screen displays all available network options for the Shopper to choose from.
8c. Payment pending
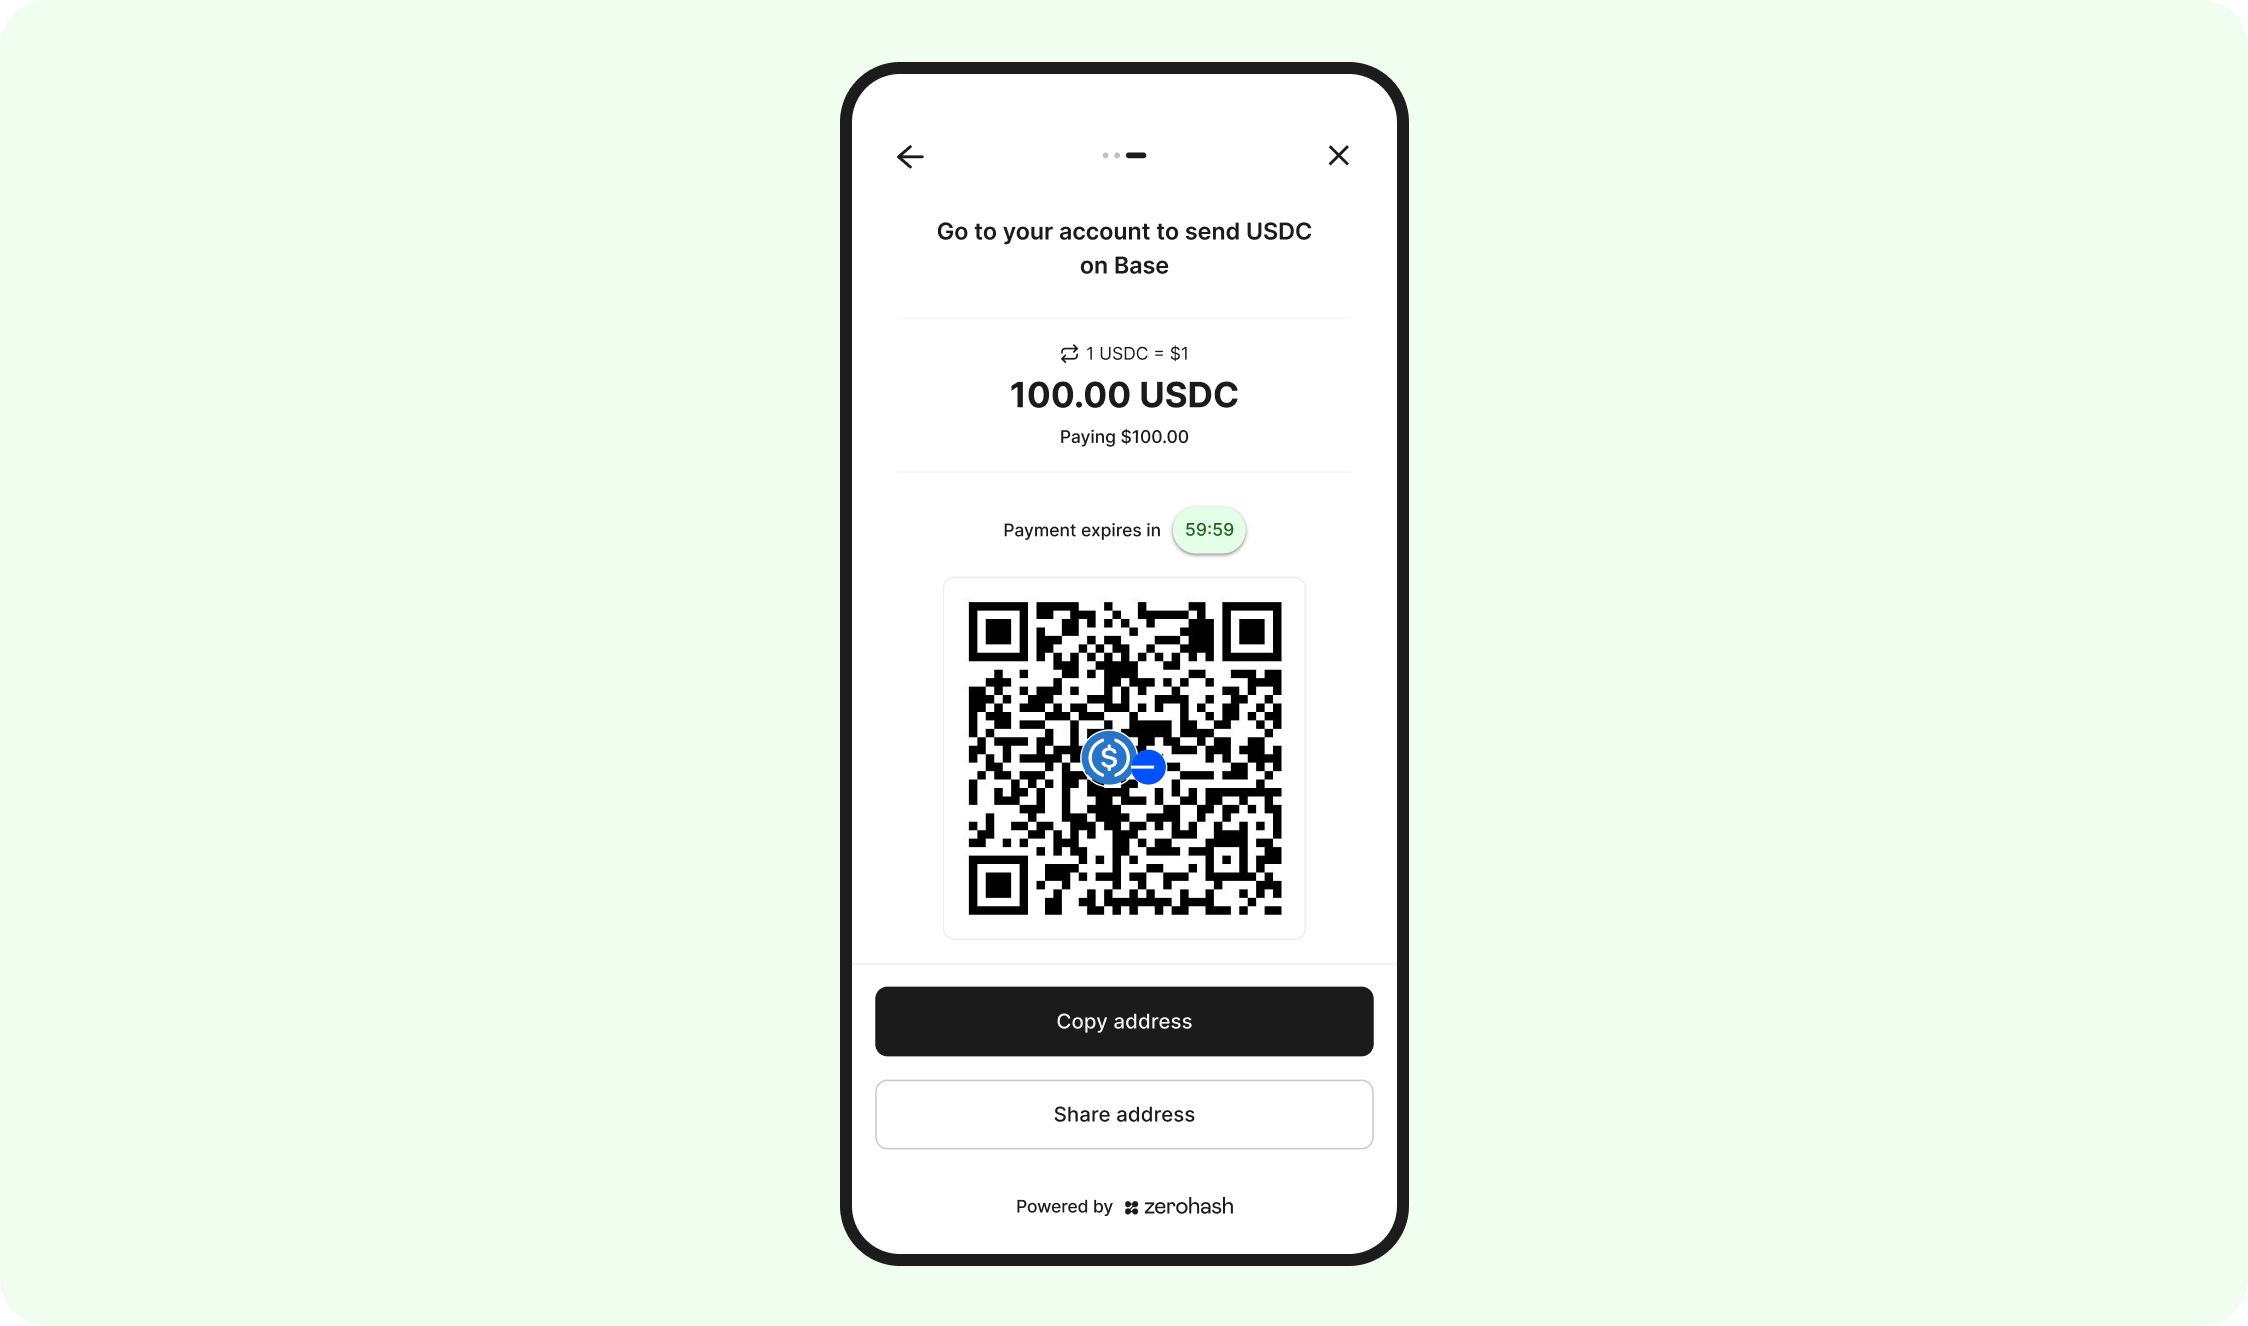
The Shopper is now presented with the information to successfully make the payment:
- Conversion rate
- Payment amount
- Payment expiration time
- QR code and address
The expectation is that the Shopper, with relative urgency, takes the following steps:
If the Shopper is paying from their mobile phone
- Copies address
- Navigates to their preferred exchange or wallet (ie, Coinbase Exchange or Metamask wallet)
- Selects the same Asset they chose on the zerohash SDK
- Selects the same Network they chose on the zerohash SDK
- Enters the exact amount that was displayed on the Payment Pending screen
- Initiate the transaction
If the Shopper is paying from their computer (web)
- Navigates to their preferred exchange or wallet (ie, Coinbase Exchange or Metamask wallet)
- Selects the same Asset they chose on the zerohash SDK
- When asked to enter the address, selects the "scan QR code" option
- Point your device’s camera at the QR code displayed on your computer screen, ensuring it’s centered and clearly visible
- Selects the same Network they chose on the zerohash SDK
- Enters the exact amount that was displayed on the Payment Pending screen
- Initiate the transaction
8d. Payment Successful
If the Shopper sends at least the displayed amount of the correct crypto or stablecoin, using the specified asset and network, the SDK will automatically transition to the next screen:
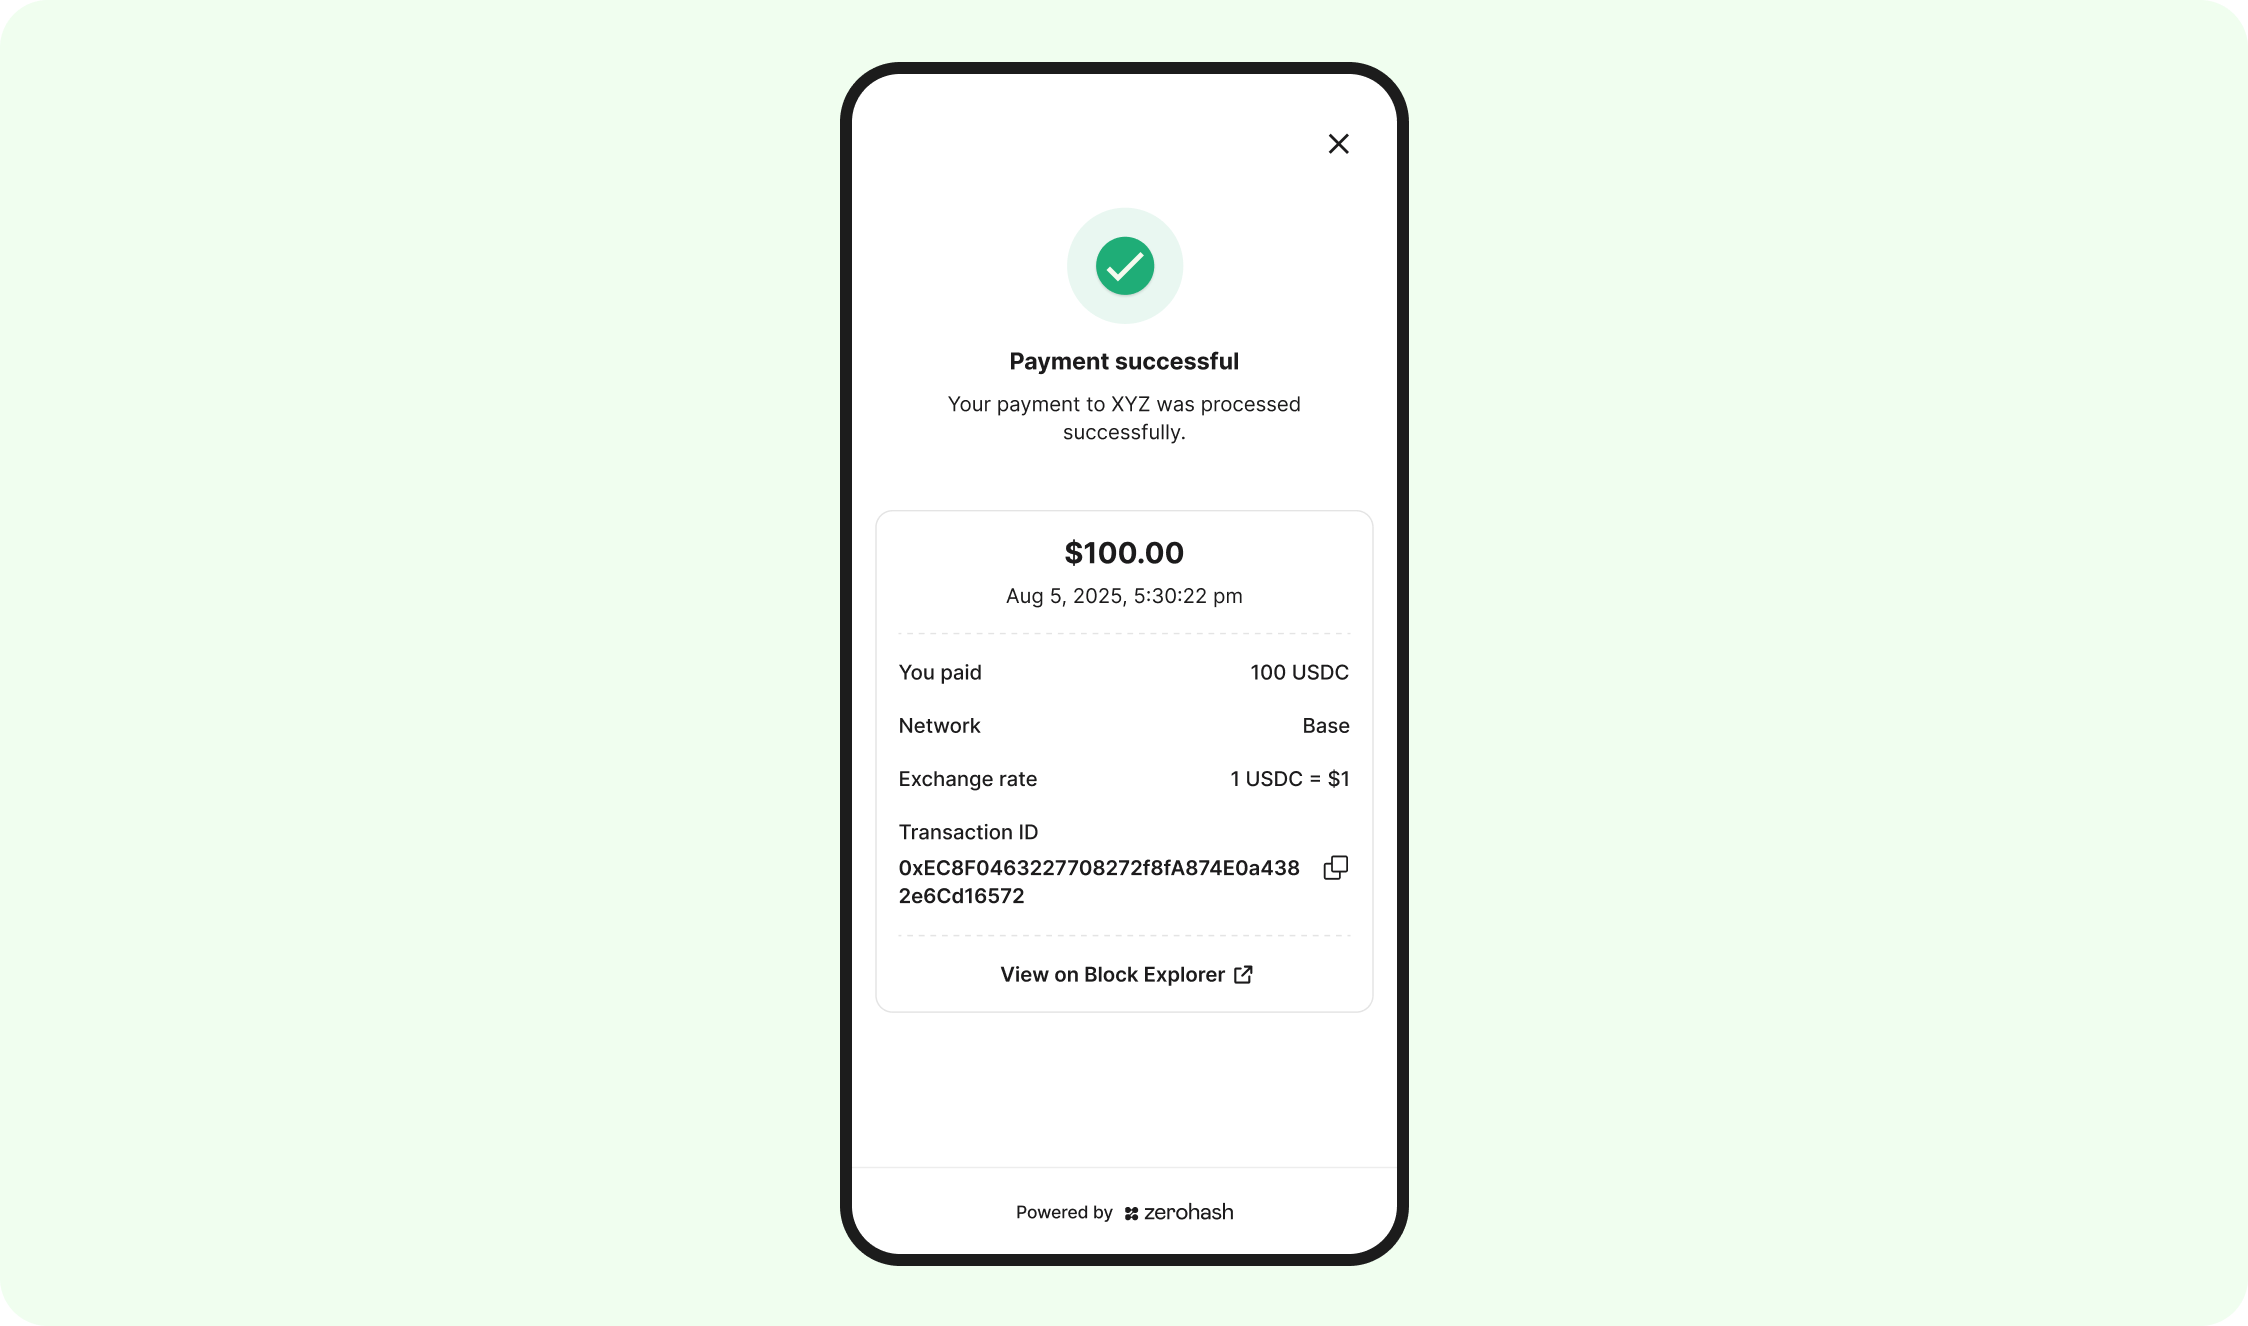
Successful Payment (exact amount)
Once a successful payment is received for the exact amount, we'll send a webhook to you that looks like this:
{
  "participant_code": "SHOPP1",
  "fund_asset": "USDC.BASE",
  "rate": "1",
  "quoted_currency": "USD",
  "source_address": "external",
  "deposit_address": "0xb07C48f0BF25A97034c818Dc643A98e42703D20c",
  "quantity": "100",
  "notional": "100",
  "fund_id": "6767a149-4771-4166-ba07-a2542e361318",
  "fund_timestamp": 1756376889792000000,
  "deposit_timestamp": 1756376889499000000,
  "transaction_id": "d1d731ed-952c-410e-b62b-eb00e3d096fc",
  "account_label": "general",
  "success": true,
  "reason": "",
  "reference_id": "04918aef-41d1-4dfb-82b8-2fdc232a8d88",
  "raw_fee_bps": "",
  "deposit_fee_bps": "",
  "raw_fee_notional": "",
  "deposit_fee_notional": ""
}
Successful Payment (over payment)
Once a successful payment is received where the Shopper sent too much, we'll send a webhook to you that looks like this:
{
  "participant_code": "SHOPP1",
  "fund_asset": "USDC.BASE",
  "rate": "1",
  "quoted_currency": "USD",
  "source_address": "external",
  "deposit_address": "0xb07C48f0BF25A97034c818Dc643A98e42703D20c",
  "quantity": "100",
  "notional": "100",
  "fund_id": "6767a149-4771-4166-ba07-a2542e361318",
  "fund_timestamp": 1756376889792000000,
  "deposit_timestamp": 1756376889499000000,
  "transaction_id": "d1d731ed-952c-410e-b62b-eb00e3d096fc",
  "account_label": "general",
  "success": true,
  "reason": "over payment",
  "reference_id": "04918aef-41d1-4dfb-82b8-2fdc232a8d88",
  "raw_fee_bps": "",
  "deposit_fee_bps": "",
  "raw_fee_notional": "",
  "deposit_fee_notional": ""
}
8d. Payment Unsuccessful
There are a few scenarios that will lead a failed payment which will be reflected on the SDK UI:
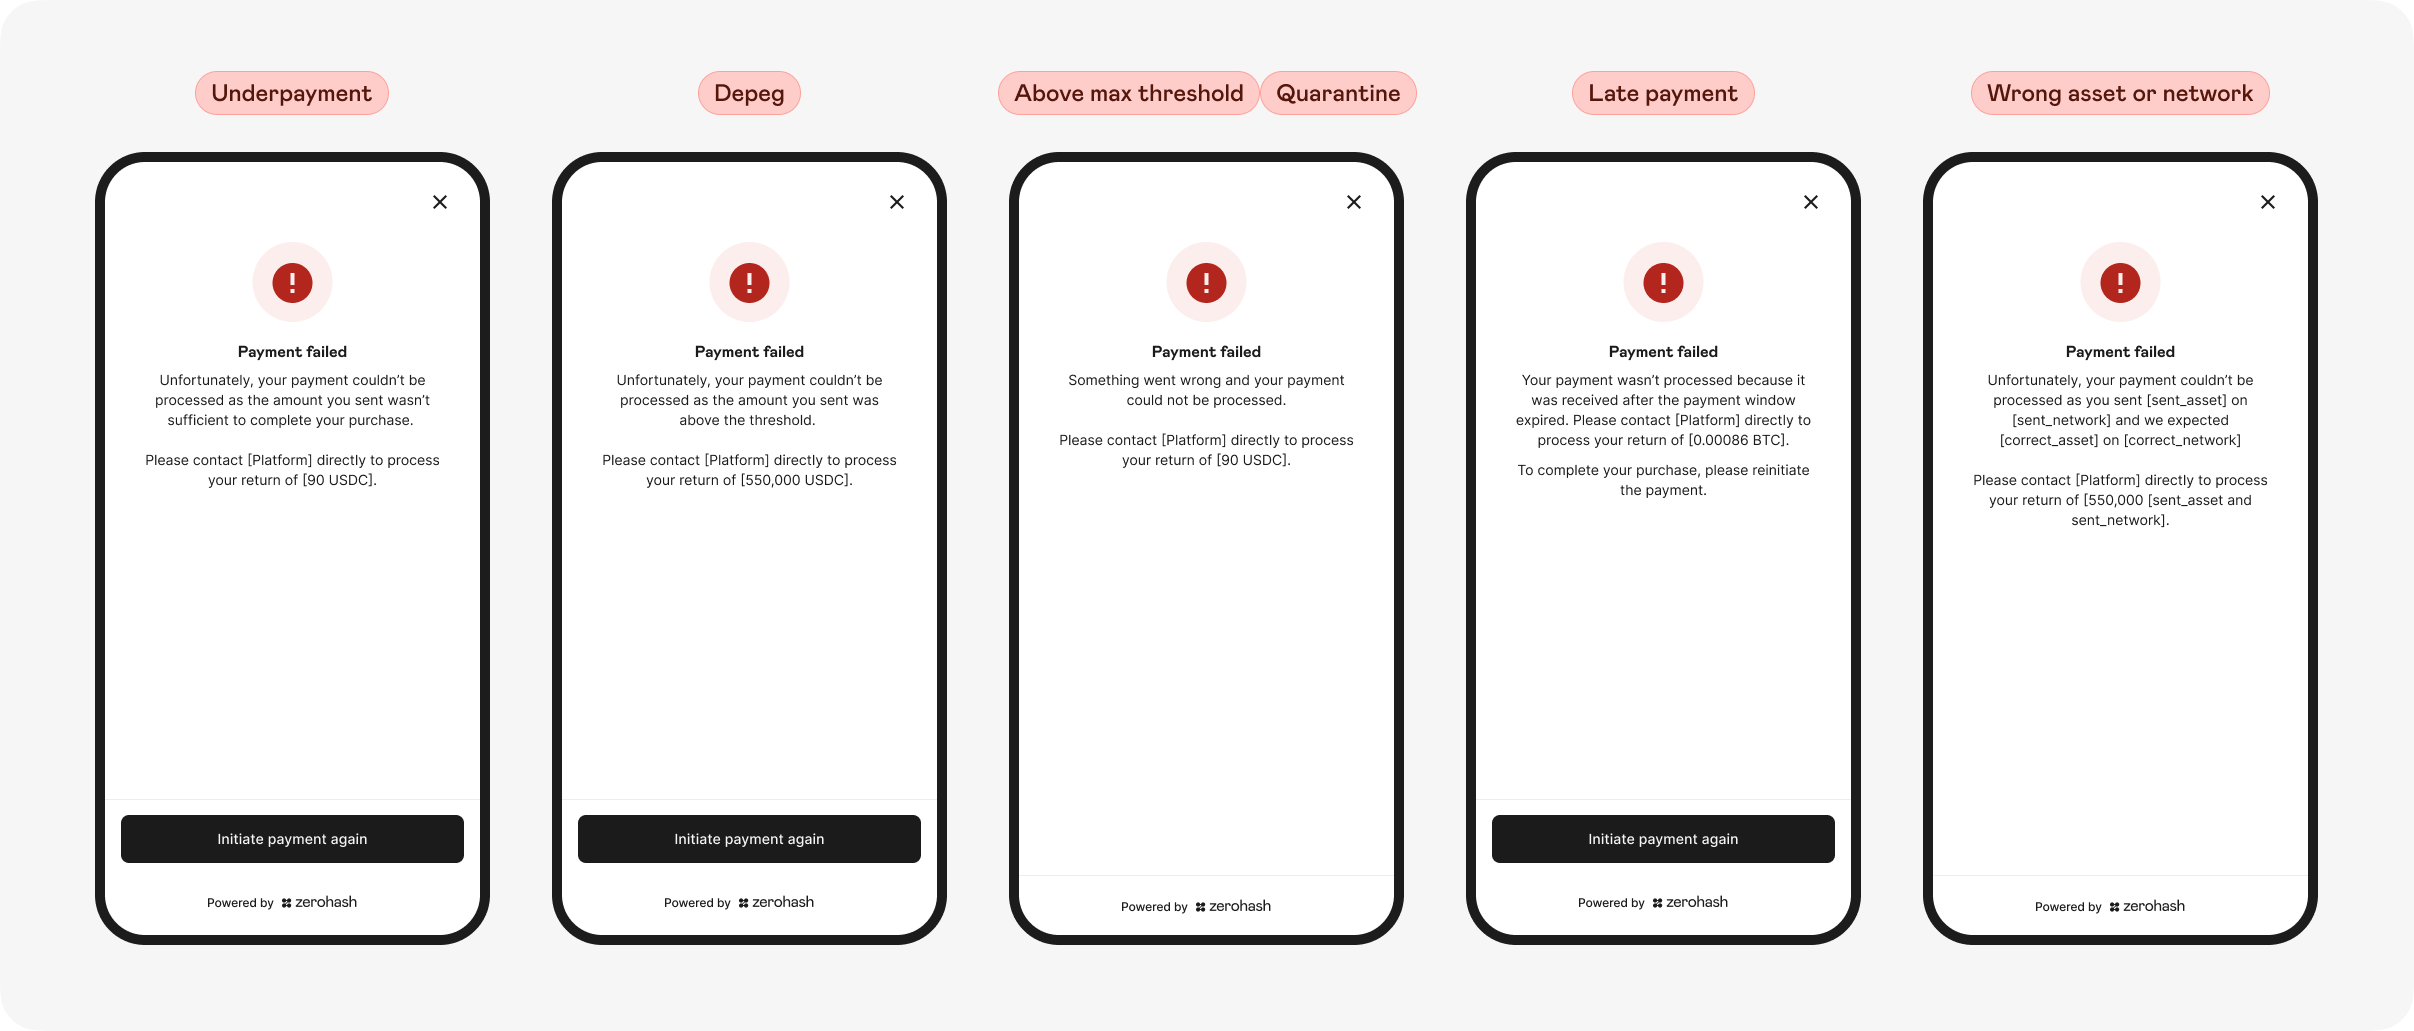
| Failure scenario | Expected remediation steps |
|---|---|
| Under payment | Shopper to contact Platform → Platform to facilitate a withdraw via POST /payments to Shopper's wallet |
| Depeg | Shopper to contact Platform → Platform to contact zerohash via Slack or Email to facilitate withdrawals back to the Shopper manually |
| Above max threshold | Shopper to contact Platform → Platform to contact zerohash via Slack or Email to facilitate withdrawals back to the Shopper manually |
| Quarantine | Shopper to contact Platform → Platform to contact zerohash via Slack or Email. Note: zerohash will likely disable this Shopper, as this scenario is typically triggered due receiving a deposit from a high-risk source address |
| Late payment | Shopper to contact Platform → Platform to facilitate a withdraw via POST /payments to Shopper's wallet |
| Wrong asset or network | Shopper to contact Platform → Platform to facilitate a withdraw via POST /payments to Shopper's wallet |
Payment Unsuccessful (under payment)
Upon a payment for an insufficient amount, a webhook notification will be triggered as follows
{
  "participant_code": "SHOPP1",
  "fund_asset": "USDC.BASE",
  "rate": "1",
  "quoted_currency": "USD",
  "source_address": "external",
  "deposit_address": "0xb07C48f0BF25A97034c818Dc643A98e42703D20c",
  "quantity": "90",
  "notional": "",
  "fund_id": "6767a149-4771-4166-ba07-a2542e361318",
  "fund_timestamp": 1756376889792000000,
  "deposit_timestamp": 1756376889499000000,
  "transaction_id": "d1d731ed-952c-410e-b62b-eb00e3d096fc",
  "account_label": "general",
  "success": false,
  "reason": "under payment",
  "reference_id": "04918aef-41d1-4dfb-82b8-2fdc232a8d88",
  "raw_fee_bps": "",
  "deposit_fee_bps": "",
  "raw_fee_notional": "",
  "deposit_fee_notional": ""
}
Successful Payment (depeg)
If a stablecoin becomes depegged, to mitigate zerohahs's risk, we will manually mark the asset as depegged on our side. This will block all “sell” transactions converting that stablecoin to USD. Should we receive a payment deposit during this period, we will not convert the deposit to fiat. Instead, the funds will be moved to a dedicated depeg account, and a webhook notification will be triggered as follows:
{
  "participant_code": "SHOPP1",
  "fund_asset": "USDC.BASE",
  "rate": "1",
  "quoted_currency": "USD",
  "source_address": "external",
  "deposit_address": "0xb07C48f0BF25A97034c818Dc643A98e42703D20c",
  "quantity": "100",
  "notional": "",
  "fund_id": "6767a149-4771-4166-ba07-a2542e361318",
  "fund_timestamp": 1756376889792000000,
  "deposit_timestamp": 1756376889499000000,
  "transaction_id": "d1d731ed-952c-410e-b62b-eb00e3d096fc",
  "account_label": "general",
  "success": false,
  "reason": "depeg",
  "reference_id": "04918aef-41d1-4dfb-82b8-2fdc232a8d88",
  "raw_fee_bps": "",
  "deposit_fee_bps": "",
  "raw_fee_notional": "",
  "deposit_fee_notional": ""
}
Above max threshold
zerohash has certain liquidation maximums on our end. If a large deposit is received above this threshold, a webhook notification will be triggered as follows:
{
  "participant_code": "SHOPP1",
  "fund_asset": "USDC.BASE",
  "rate": "1",
  "quoted_currency": "USD",
  "source_address": "external",
  "deposit_address": "0xb07C48f0BF25A97034c818Dc643A98e42703D20c",
  "quantity": "10000000",
  "notional": "",
  "fund_id": "6767a149-4771-4166-ba07-a2542e361318",
  "fund_timestamp": 1756376889792000000,
  "deposit_timestamp": 1756376889499000000,
  "transaction_id": "d1d731ed-952c-410e-b62b-eb00e3d096fc",
  "account_label": "general",
  "success": false,
  "reason": "depeg",
  "reference_id": "04918aef-41d1-4dfb-82b8-2fdc232a8d88",
  "raw_fee_bps": "",
  "deposit_fee_bps": "",
  "raw_fee_notional": "",
  "deposit_fee_notional": ""
}
Quarantine
If zerohash detects that the source address of the payment deposit is high-risk, a webhook notification will be triggered as follows:
{
  "participant_code": "SHOPP1",
  "fund_asset": "USDC.BASE",
  "rate": "1",
  "quoted_currency": "USD",
  "source_address": "external",
  "deposit_address": "0xb07C48f0BF25A97034c818Dc643A98e42703D20c",
  "quantity": "10000000",
  "notional": "",
  "fund_id": "6767a149-4771-4166-ba07-a2542e361318",
  "fund_timestamp": 1756376889792000000,
  "deposit_timestamp": 1756376889499000000,
  "transaction_id": "d1d731ed-952c-410e-b62b-eb00e3d096fc",
  "account_label": "general",
  "success": false,
  "reason": "For Zero Hash Compliance reasons, the deposit has not been converted to fiat and the crypto has been credited to a Zero Hash holding account",
  "reference_id": "04918aef-41d1-4dfb-82b8-2fdc232a8d88",
  "raw_fee_bps": "",
  "deposit_fee_bps": "",
  "raw_fee_notional": "",
  "deposit_fee_notional": ""
}
Late payment
If zerohash receives a payment deposit past the Payment Window, a webhook notification will be triggered as follows:
{
  "participant_code": "SHOPP1",
  "fund_asset": "USDC.BASE",
  "rate": "1",
  "quoted_currency": "USD",
  "source_address": "external",
  "deposit_address": "0xb07C48f0BF25A97034c818Dc643A98e42703D20c",
  "quantity": "10000000",
  "notional": "",
  "fund_id": "6767a149-4771-4166-ba07-a2542e361318",
  "fund_timestamp": 1756376889792000000,
  "deposit_timestamp": 1756376889499000000,
  "transaction_id": "d1d731ed-952c-410e-b62b-eb00e3d096fc",
  "account_label": "general",
  "success": false,
  "reason": "payment session has expired",
  "reference_id": "04918aef-41d1-4dfb-82b8-2fdc232a8d88",
  "raw_fee_bps": "",
  "deposit_fee_bps": "",
  "raw_fee_notional": "",
  "deposit_fee_notional": ""
}
Wrong asset or network
If zerohash receives a payment deposit for an asset that was not selected by the Shopper on the Select Asset page, a webhook notification will be triggered as follows:
{
  "participant_code": "SHOPP1",
  "fund_asset": "ETH",
  "rate": "1",
  "quoted_currency": "USD",
  "source_address": "external",
  "deposit_address": "0xb07C48f0BF25A97034c818Dc643A98e42703D20c",
  "quantity": ".15",
  "notional": "",
  "fund_id": "6767a149-4771-4166-ba07-a2542e361318",
  "fund_timestamp": 1756376889792000000,
  "deposit_timestamp": 1756376889499000000,
  "transaction_id": "d1d731ed-952c-410e-b62b-eb00e3d096fc",
  "account_label": "general",
  "success": false,
  "reason": "deposit currency does not match the expected currency",
  "reference_id": "04918aef-41d1-4dfb-82b8-2fdc232a8d88",
  "raw_fee_bps": "",
  "deposit_fee_bps": "",
  "raw_fee_notional": "",
  "deposit_fee_notional": ""
}
9. Query payments
You can query our REST endpoint GET /fund/transactions to retroactively view payment details.
10. Settlement
Zero Hash will, one time per day, send you a fiat settlement wire where the amount represents the sum of all converted payments from the prior trading session. Here is the settlement schedule:
| Session | Start | End | Expected Settlement Time |
|---|---|---|---|
| Monday | Monday 9:00a EST | Tuesday 8:59:59a EST | Tuesday EOD |
| Tuesday | Tuesday 9:00a EST | Wednesday 8:59:59a EST | Wednesday EOD |
| Wednesday | Wednesday 9:00a EST | Thursday 8:59:59a EST | Thursday EOD |
| Thursday | Thursday 9:00a EST | Friday 8:59:59a EST | Friday EOD |
| Friday | Friday 9:00a EST | Monday 8:59:59a EST | Monday EOD |
During US holidays, Platforms should expect their settlements to arrive by EOD on the next business day. For example, for the August 30th 2024 session, the settlement will arrive by Tuesday EOD (because Monday was Labor Day)
11. Refund a Payment
In order to initiate a refund, you should use the following endpoints:
- POST /payments/external_accounts - links a crypto account where the Shopper will receive their refund
- POST /payments - initiates a conversion from USD (using Refund account) to the crypto asset. This API call will also automatically and immediately send the funds on-chain.
IMPORTANT: You cannot rely on the deposit’s source address as the refund destination. Blockchain transactions are not inherently bidirectional, and returning funds to the sender address may result in loss of funds or failed deliveries.
Some Platforms may choose to pair their zerohash integration with their own transaction monitoring tools. In situations where zerohash accepts a deposit, but the Platform’s monitoring logic flags and rejects it, the Platform may opt to return the deposit by using the POST /convert_withdraw/rfq and POST /convert_withdraw/execute endpoint.
The required flow is to always request and confirm a return address directly from the Shopper before initiating the return.
Please speak to a zerohash sales engineer for guidance if interested in this flow.
Updated 18 days ago